Some people love the Touch Bar, while others think it’s a gimmick. Whatever the case may be, there’s a good chance that you aren’t getting the most out of the feature. Luckily, we’re here to help with some great MacBook Pro Touch Bar tips.
When the first Touch Bar-equipped MacBook Pro debuted in 2016, the feature seemed to have a lot of promise. Since then, it’s seemingly amassed mostly critics. But that doesn’t mean that the Touch Bar can’t be useful. In fact, most people may not be taking advantage of it.
With that in mind, here are three general ways you can make the most of your Touch Bar — whether you’re a fan of it, you hate it, or you just want to make it more of a must-have feature.
You can set the Touch Bar to only display the function key strip or system controls (like volume and brightness).
Pretend it isn’t there
If you’re unlikely to become a Touch Bar convert and you just want your function keys back, there’s actually a way to do that. Of course, you won’t have actual, physical function keys. But if you have a newer MacBook Pro and are missing the function strip, this is maybe the next best thing.
By default, macOS will display App Controls with a Control Strip. This means that the Touch Bar’s user interface will change contextually depending on the app that you’re using.
That’s fine and dandy, but it also means that getting to the function keys (like the brightness or volume sliders) takes an extra step in most situations.
But you can do away with this completely by setting the Touch Bar to only display the function key strip.
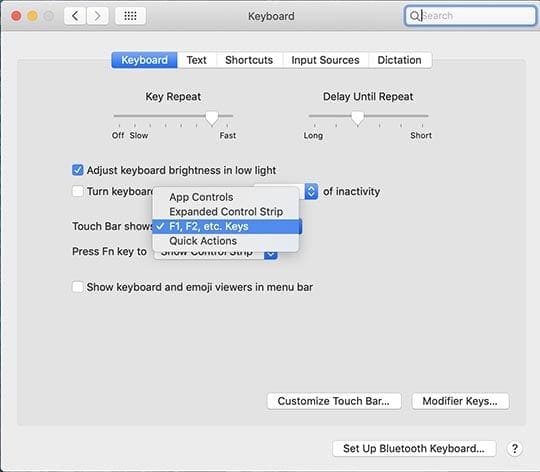
Click on the Apple logo in the top menu bar.
Select System Preferences.
Click on the Keyboard function.
Under the Keyboard heading, click on the menu box next to Touch Bar shows.
In the dropdown menu, select Function Keys.
At this point, the Touch Bar will show the function key strip by default no matter which app you’re using.
On the other hand, you can also go to Shortcuts and select the Function Key option on a per-app basis. This is handy if you like the Touch Bar in Photoshop but not anywhere else.
Customize the Touch Bar to your preferences
If you’d like to get some use out of the Touch Bar but you aren’t happy with the default configuration, there is the option to customize it.
You have two general options: the basic controls and accessibility features.
Built-in controls
Apple’s native Touch Bar customization isn’t all that in-depth, but it’s worth checking out if you’d like to get more out of the UI element.
There aren’t basic customization options, but they’re still there if you’d like to experiment with them. You can find them in System Preferences —> Keyboards —> Customize Touch Bar.
By default, the Touch Bar will display a brightness button, a volume button, a mute button and the Siri button. But you can actually swap any of these icons for the other available controls.
There’s an option to quickly open Launchpad or Mission Control, for example. Want to quickly take a screenshot or bring up Spotlight search with a tap? You can do that, too.
In the author’s humble opinion, one of the most useful options is the agility to enable or disable Night Shift with a single tap.
Again, there aren’t many options and most of them aren’t all that powerful. But there are still a few worth checking out.
Add Accessibility options to Touch Bar
You can add certain accessibility options to the Touch Bar for easier, one-tap access.
In addition to the basic customization options, there are also some accessibility features that can be added to the Touch Bar. This is imperative for those who need them, but it can also be useful for any user.
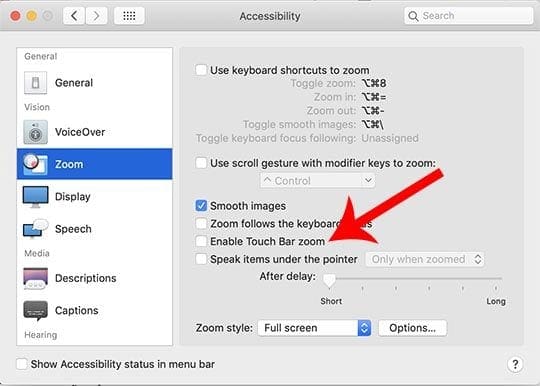
You can, for example, enable VoiceOver on your Touch Bar, or you can add the built-in macOS Zoom feature to the peripheral interface.
You’ll find these options in System Preferences —> Accessibility. Some options, like VoiceOver, will be enabled automatically on the Touch Bar when you turn on the accessibility feature itself.
Use a third-party App to get more out of Touch Bar
At this point in the article, you’ve probably noticed that the native macOS settings for the Touch Bar are rather limited. But since macOS isn’t a walled-garden software like iOS, there’s the potential for a wide variety of third-party experimentation. Third-party apps can even access the Touch Bar UI and allow users to customize it to their liking.
You can personalize the Touch Bar far beyond what Apple allows you to do natively. For the purposes of this article, we’ll focus on two good Touch Bar-related apps: Pock and Better Touch Tool.
Pock
Pock will let you display the macOS Dock in the Touch Bar — saving some precious screen real estate.
Pock is a useful little app that can help you save some screen real estate. Essentially, it displays the macOS Dock (where all of your opened apps live) on the Touch Bar.
This is particularly useful for owners of the 12-inch MacBook or 13-inch MacBook Pro and MacBook Air devices. On those devices, display space is at a premium. While most of us don’t display the Dock constantly, it can be a bit annoying to access it when we need it.
You can easily navigate between your open apps (and open new ones) without ever needing to hover over the bottom of the display to bring up the Dock.
If you don’t use the Touch Bar currently, you will hardly notice anything missing. You’ll still have important control keys (like brightness, volume and mute) and Pock will also display an Escape key so you’re never without it.
Pock is a free download. You can view its website here and its Github page here.
Better Touch Tool
With a little know-how, you can completely overhaul what type of information or UI elements the Touch Bar displays. Image courtesy of Brendan Le Glaunec.
If you’re looking to maximize your Touch Bar experience and you don’t mind a bit of scripting or coding, then Better Touch Tool is an amazing option.
With Better Touch Tool, you can completely customize the layout of the Touch Bar. With AppleScript support, the possibilities are literally endless. For one, you can create dedicated buttons to access your various workspaces (writing, coding, Photoshop, etc.).
But you can also have a Spotify widget that lets you know which song is actively playing — right on the Touch Bar. Or a Touch Bar with dedicated buttons letting you know the current prices for various cryptocurrencies.
If you have enough know-how, you can customize basically everything about it. That includes the width of the buttons, their specific colors, or their icons. Better Touch Tool also lets you set personalized taps and gesture commands, even for the Force Trackpad on Mac notebooks (but that’s another topic entirely).
Honestly, the app is one in which it could take months or years for you to realize its full potential and explore all of its possibilities— there’s just too much to cover here. So we’ll just refer you to the website and Github page.
Bonus Tip: Take a screenshot of the Touch Bar
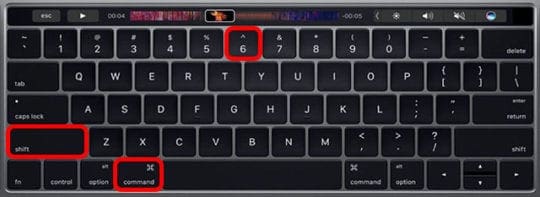
Just like your display, you can take a picture of the MacBook Pro Touch Bar with a keyboard command.
To be clear, this isn’t necessarily a tip to make the Touch Bar more useful. But it is a little-known trick that could come in handy.
You probably know you can take a screenshot of your display with an easy keyboard command. But there’s also a keyboard shortcut for screenshotting the Touch Bar, too. Just hold down Shift + Command + 6. Like with other system screenshots, the image will appear on your Desktop (or whatever folder you’ve set screenshots to save to).
We hope that you are going to take full advantage of the Touch Bar feature on your MacBook Pro. What are some of the features that you like when it comes to using the Touch Bar? Please let us know in the comments below.
Mike is a freelance journalist from San Diego, California.
While he primarily covers Apple and consumer technology, he has past experience writing about public safety, local government, and education for a variety of publications.
He’s worn quite a few hats in the journalism field, including writer, editor, and news designer.
I’m not a very frequent use of the Touch Bar, but recently 2 buttons came in very handy: the language input selector for the keyboard, and the screen capture button.


I’m not a very frequent use of the Touch Bar, but recently 2 buttons came in very handy: the language input selector for the keyboard, and the screen capture button.