macOS Sierra introduced us to using Siri on our Macbooks and iMacs. Siri provides us with ample assistance on our Macs to find and work with files, create reminders and play music on command among other functions.
Currently, ”Hey Siri” is available only on MacBook Pro models introduced in 2018 when the computer lid is open.
For all other Macs, we are still missing the “Hey Siri” functionality.
In this article, we will show you a workaround that will show you how to get hey Siri on your MacBook running macOS Sierra.
Why No Hey Siri On Most Macs?
For apparent reasons surrounding processing and performance, Apple did not provide Macs with Hey Siri.
To get Siri up and running on your Macbook, you will have to hit the designated buttons that you set up in your preferences. If you have not used Siri before or have had challenges in getting your Siri up and running on your Macbook, the two articles below should help you:
Now that we have the basics covered, let’s get you set up with the workaround to start using Hey Siri on your MacBook.
The workaround involves using macOS Dictation commands along with Siri. Please follow the steps below:
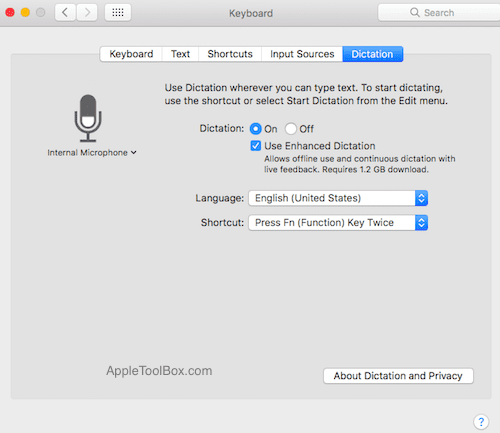
Step – 1 Open System Preferences and Click on Keyboard to access the Keyboard pane
Step – 2 Next, you will click on the Dictation tab. On this screen, Go ahead and Turn on Dictation and choose “Use Enhanced Dictation”.
This triggers a download so that the enhanced files will start downloading onto your Macbook
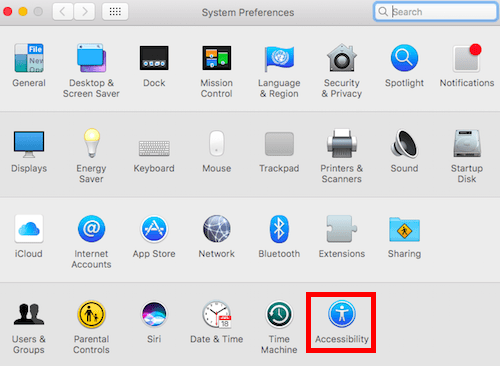
Step – 3 Once the enhanced dictation files have downloaded onto your machine, Open system Preferences and click on Accessibility.
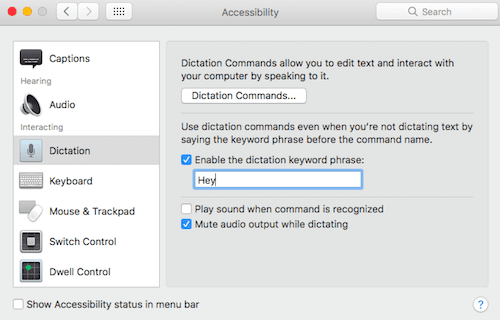
Step – 4 Scroll down on the left pane on accessibility window and choose Dictation. Next, Turn on “Enable the dictation keyword phrase”.
Type “Hey” in the box below without any quotes.
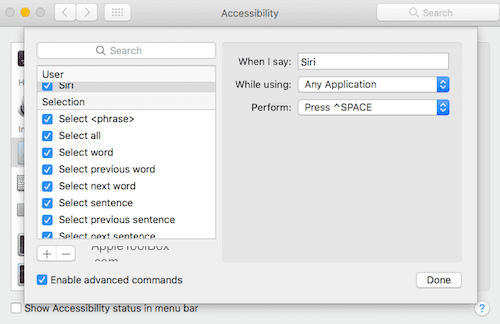
Step – 5 Click on Dictation Commands on this screen and check ‘Enable advanced commands’ on the next screen.
Next, click on the ‘+’ button and enter “Siri” in “When I say” field. While Using should point to “ Any Application” and for the Perform field, set it to use Press Keyboard Shortcut and press Control and Spacebar keys.
You should see the settings as shown in the image below. Press Done once complete.
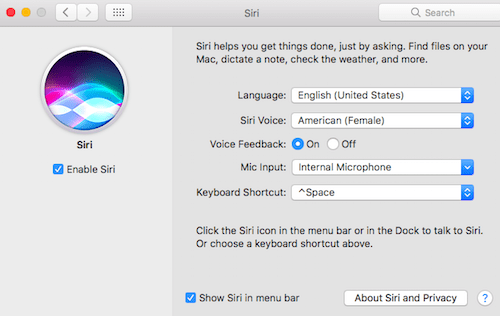
Step – 6 Open System Preferences > click on Siri to open Siri preferences.
Here you will need to change Siri Shortcut to Ctrl+Spacebar and you are done. When you say “Hey Siri”, your MacBook will kick into action.
Triggering Hey Siri by using the combination of enhanced Dictation and Siri Preferences is easy and fun
For those that have installed macOS Sierra on an older MacBook or Mac, please note that this may come with some overhead both regarding memory and performance.
This is because you will have to download the essential files to your Macbook for enhanced dictation to work. There is a slight overhead in the performance of the machine when using enhanced dictation. Please check your activity monitor while trying out this workaround.
We hope you like this workaround. If you have other favorite tips that you have uncovered while using macOS Sierra, please feel to shoot it our way in the comments below.
Obsessed with tech since the early arrival of A/UX on Apple, Sudz (SK) is responsible for the original editorial direction of AppleToolBox. He is based out of Los Angeles, CA.
Sudz specializes in covering all things macOS, having reviewed dozens of OS X and macOS developments over the years.
In a former life, Sudz worked helping Fortune 100 companies with their technology and business transformation aspirations.


Write a Comment