Email mailboxes in the macOS Mail app can quickly become cluttered and disorganized. That’s exactly why Apple added in an Archive tool that can help you keep your messages tidy.
The Archive tool is also a handy way to store durable copies of your messages that are immune to any server actions (like server crashes or accidental deletion). Here’s how to use Archive and where to find your emails after.
Related:
- 21 Apple Mail tips and tricks you may not have known for iOS and macOS
- Everything new in Mail for macOS Catalina
- How to Fix macOS Mail Issues After Upgrading to Two-Factor Authentication
- Mail not working in macOS Catalina, How-to fix
Contents
How to archive a message
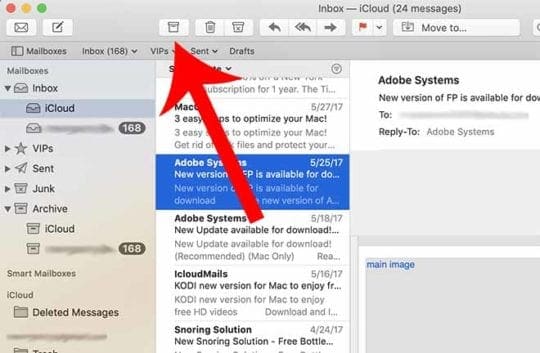
Archiving an email message in macOS is pretty simple. In fact, it’s just a two-step process.
- Open a message in Mail.
- Click on the Archive icon in the top menu bar. It’ll look like a cardboard box with a straight line across it.
At this point, Mail will automatically create a new Mailbox called Archive. Messages that you Archive will be placed within this Mailbox (but they will also be pulled from your email provider’s server).
If you’re using a third-party mail service with the Mail app, this may be confusing. That’s because all of your inbox will be stored in the Archive folder for that particular account.
Just note that these are local copies. If you archive a message in a third-party Mailbox, that message will indeed be pulled from the email provider’s servers.
You can also edit where archived emails are stored by going to Mail —> Preferences —> Accounts and selecting the Mailbox Behaviors tab.
From here, you can actually set the Archive to a new mailbox, which you can choose to store locally on your computer.
Where are archived messages stored?
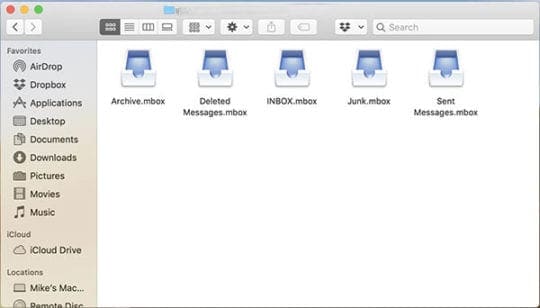
As we mentioned earlier, copies of your email messages are stored locally on your Mac when you use the Archive feature.
Unfortunately, they’re just not that easy to get to. They’re buried in a folder in the macOS Library and the archive itself uses a .mbox file extension.
You can access with the following steps.
- Open a Finder window.
- Hold down Option and click on Go in the top menu bar.
- Select Library from the dropdown menu.
- Look for a folder called Mail.
- From here, you should see another couple of folders that appear to be randomly named (V6 and a string of characters).
- Click through these folders until you find several .mbox. Click on Archive.
- From here, you can dive deeper into the folder tree until you see a folder named Messages. This is where macOS stores .emix copes of your emails in Archive.
There may be formatting or image issues, particularly if the content is web-based. But these are locally stored copies of your email messages. That, of course, means that they are immune to any server-based activities.
Some things to note
While that covers the gist of using Archive and finding your archived messages, here are a couple more tips to ensure your emails remain organized and secure.
Create additional archive mailboxes
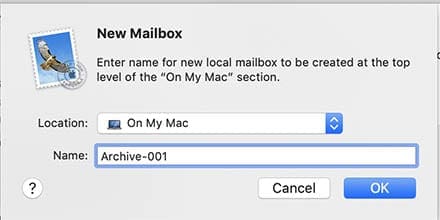
Because of the way that macOS Mail treats third-party mailboxes, it can be confusing to use the built-in Archive tool.
If all of your emails are stored in Archive from the get-go and Archive only pulls them from the server, it can lead to some organizational issues.
Because of that, we recommend creating new local mailboxes on your system. Just click on Mailbox in the top menu bar and select New Mailbox.
Select On My Mac as the Location and name the mailbox something meaningful — such as “important Gmail messages” or “archived emails August 2019.”
Now, you’ll want to go back to Mail —> Preferences —> Accounts —> Mailbox Behaviors. Set the Archive mailbox to your newly created folder.
Export mailbox
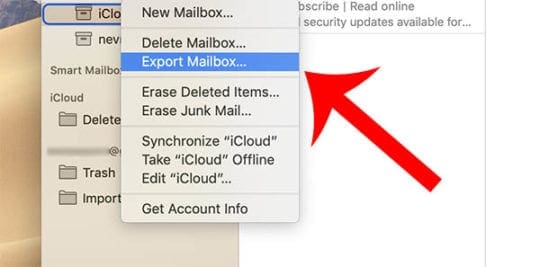
If you’d like a copy of your precious emails for more durable storage, we just recommend using Export Mailbox. This also helps keep your archived messages in a more readily accessible location on your hard drive.
That way, you can pop email messages onto an external media device or a USB flash drive for permanent storage.
This is especially important because locally stored emails are prone to data loss. If something happens to the Mac that you’re using, there may not be any easy way to recover those emails.
- Select a Mailbox that you’d like to export.
- Right-click on the mailbox.
- Click on Export Mailbox… from the dropdown menu.
- Choose a destination folder and select Choose.
Now, you can save that mailbox — with copies of all your messages — to a safe and easily accessible location.
We hope that you found the article helpful. Getting an handle on your archives in always a good thing and is bound to save you heartache during a crisis.

Mike is a freelance journalist from San Diego, California.
While he primarily covers Apple and consumer technology, he has past experience writing about public safety, local government, and education for a variety of publications.
He’s worn quite a few hats in the journalism field, including writer, editor, and news designer.




I liked your article on how to easily archive important emails on a Mac. Unfortunately, when I tried to implement the method of creating a new mailbox and then opening mailbox behaviors in the preferences of MacMail and changing the file in the ‘archive’ behavior to your newly created folder, that folder never shows up in the archive ‘pull down’. You can’t select it.
I have the same problem. You cannot choose the newly created folder in Mail Behaviour.
It is a bit worrying that you did not get since November 2021
What works instead is to simply type “Mail” in the search bar (top right of your finder window). Then check the folders named mail (I have several) and you will find the archives.
Question: I started an Apple POP Mail account and later added an IMAP account with the same name. If I archive the POP account, will it affect the IMAP account like losing mail? Both accounts have the same messages, and received messages should come in faster if the POP is archived?
Appreciate your answer.