Apple’s macOS Catalina is the latest version of the company’s Mac operating system. But that doesn’t mean it’s for everyone — and if it isn’t for you, you should consider downgrading back to macOS Mojave.
Whether you rely on 32-bit apps or you just don’t like some of the new required features in Catalina, here’s how to go about wiping the latest version of macOS from your system and reinstalling Mojave.
Before you begin, there’s the question of data. All of the methods you’ll use to rollback to macOS Mojave will wipe your hard drive. That means you’ll lost everything on your startup disk, including your files, data, settings and apps.
So, of course, we recommend backing up as much data as you can.
While you can use Time Machine for this, it’s smart to use a generic media or cloud-storage platform for important files.
Depending on the Time Machine backup you’ve created and the version of macOS that was running, you may be unable to get your files back.
It’s also smart to take notes of important settings and preferences. We recommend taking screenshots of your specific system settings, inputting license keys and passwords into a password manager, and copying important files to multiple place.s
How to downgrade from macOS Catalina to macOS Mojave
Once your important data is backed up, then you can go through one of the following methods to wipe macOS Catalina from your machine and get macOS Mojave back.
Don’t just read these in order. You’ll want to find the specific situation that applies to you and follow those instructions. Otherwise, you may be unable to proceed.
If your Mac shipped running macOS Mojave
If your Mac device shipped running macOS Mojave, then your downgrade method is likely the easiest.
That’s because if you wipe your disk and reinstall macOS using the Disk Utility, your Mac will install the version of macOS that came with your computer.
Click on Apple in the top menu bar.
Choose Restart.
When your Mac is restarting, hold down Command + R to boot into recovery mode.
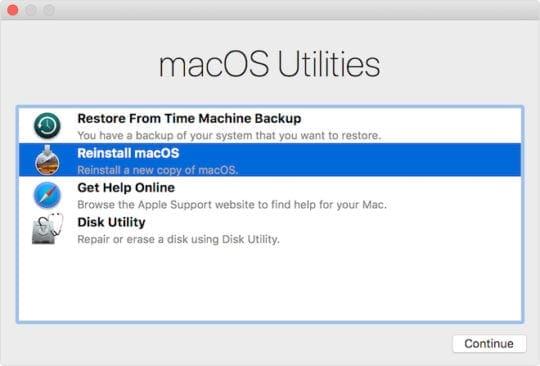
From the OS X Utilities menu, select Disk Utility
Now, select your startup disk and choose Erase.
Quit Disk Utility.
Select Reinstall macOS from the OS X Utilities menu.
Press Continue and follow the instructions.
That’s pretty much it. Once macOS Mojave is back and running on your machine, you can proceed to get your data back.
If you have a macOS Mojave backup
If you Mac shipped with an older version of macOS but you have a Time Machine backup made before you upgraded to macOS Catalina, you can just downgrade with that backup.
Click on Apple in the top menu bar.
Choose Restart.
When your Mac is restarting, hold down Command + R to boot into recovery mode.
From the OS X Utilities menu, select Disk Utility
Now, select your startup disk and choose Erase.
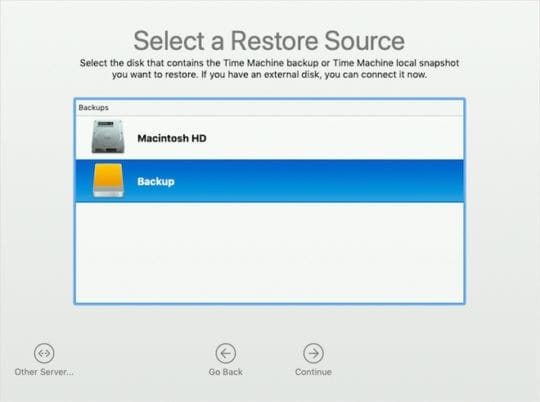
Head back to OS X Utilities menu and select Restore from Time Machine backup.
Select the backup you’d like to restore from — the more recent the better (as long as it wasn’t running macOS Catalina).
Follow the onscreen instructions.
If your Mac didn’t ship with Mojave and you don’t have a backup
If your Mac did not ship with macOS Mojave installed and you don’t have a recent backup, you’ll need to create a bootable installer before proceeding to wipe your drive.
At this point, you have a couple of options.
If macOS Catalina has not been released yet when you’re reading this, you can either download the macOS Mojave installer from the Mac App Store. Otherwise, you can download macOS Mojave from this iTunes link — although only if you aren’t running macOS Mojave on your machine already.
Once you download the installer, just get a USB drive with at least 16GB. Then, open a Terminal and type the following command.
Mike is a freelance journalist from San Diego, California.
While he primarily covers Apple and consumer technology, he has past experience writing about public safety, local government, and education for a variety of publications.
He’s worn quite a few hats in the journalism field, including writer, editor, and news designer.


sudo /Applications/Install\ macOS\ Mojave.app/Contents/Resources/createinstallmedia –volume /Volumes/OSX Mojave –applicationpath /Applications/Install\ macOS\ Mojave.app –nointeraction_
command not found.