You have downloaded macOS Mojave and given it a try! For some reason or the other, you have decided to downgrade from macOS Mojave to macOS High Sierra or earlier macOS versions.
This short guide shows you how you can go about downgrading from macOS Mojave into earlier macOS versions.
Before attempting to downgrade from macOS Mojave, make sure to back up your Mac. If you are using iCloud Drive to store documents or folders, make sure that they are synced appropriately so that you don’t end up losing any critical work in progress documents.
We back up our data just in case something goes wrong during the downgrade process. With a backup, you can still recover your data, no matter what. Because the downgrade process includes erasing your Mac’s startup drive, it is imperative that you make a backup of all your Mac’s information.
We use Time Machine to perform our backups and it is really easy. Here’s an alternative way to perform a quick backup of your MacBook.
Don’t regularly backup?
If you don’t regularly backup via Time Machine and don’t have TM backup available for the macOS version you are downgrading to, once you downgrade you can only do a file restore for individual files and folders.
You cannot do a full disk restore from a Time Machine backup created in macOS Mojave or whatever macOS version you are downgrading from. If you try to restore using the backup you made with the newer version of macOS, it installs that version of macOS too–defeating the downgrade process.
If you have an older backup available from the previous macOS version, you can restore using that older backup. And then restore any files missing from that older backup.
Download the macOS Installer
To create a bootable installer, you need to have the macOS installer file downloaded onto your Mac. You need a copy of the macOS installer to downgrade from macOS Mojave.
You may already have the installer file on your Mac in your Applications folder as a single Install file, such as Install macOS High Sierra.
We recommend downloading the latest combo update for the macOS version you want. Once the installer finishes downloading, quit the installer instead of allowing it to proceed automatically. Verify that the installer file is located in your Applications folder–the Terminal command looks for your macOS installer in the Applications folder only.
In our example, we use High Sierra but you can download macOS Sierra or even an earlier Mac OS X version.
Create a USB Bootable Installer for macOS
Insert the USB Drive into the USB Port. Make sure that the USB Drive is at least 12-15 GB capacity. You should also be logged in as an administrator to complete this process
Write Down the Drive’s volume name when it shows up in the finder
Check the contents of the drive, as it will be erased when you create a bootable drive
Click on Spotlight Search and type in Terminal
Launch Terminal utility from Spotlight
Next, type in the following command: sudo /Applications/Install\ macOS\ High\ Sierra.app/Contents/Resources/createinstallmedia –volume /Volumes/USB_DRIVE_VOLUME_NAME –applicationpath /Applications/Install\ macOS\ High\ Sierra.app –nointeraction
This command erases the USB disk, formats it properly and then starts copying the installation files onto the disk
This should take 10 – 15 minutes to complete depending upon your Mac’s specification.
You should see the Copy complete message on the terminal. Remove the USB drive from your MacBook.
As shown in the image, you can replace the old macOS version to your macOS version of choice
You can also use this Terminal Command to create a USB Bootable drive for macOS Mojave. This is very useful to have if you choose to work with macOS Mojave in the future
Don’t feel comfortable with using Terminal?
If you aren’t comfortable using the Terminal app, you can still make a bootable installer using a third-party app like DiskMaker X.
Erase macOS Mojave from MacBook
In order to erase your MacBook, start your MacBook in Recovery Mode.
Click on > Restart from the Apple menu
Press and hold Command + R keys immediately when you hold the startup sound
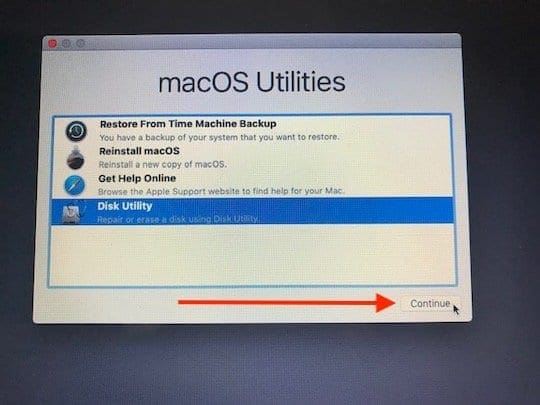
Once your Macbook starts up in Recovery Mode, select ‘Disk Utility’ from the screen and hit continue
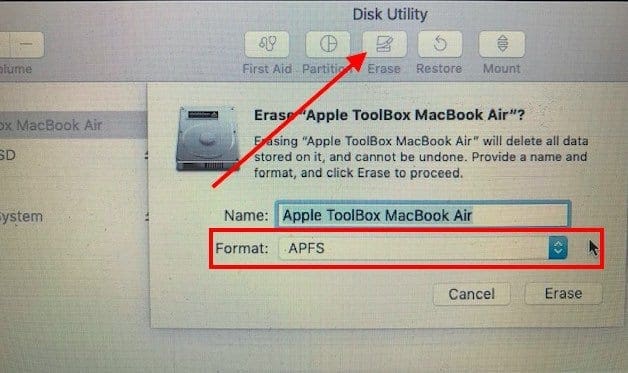
Select Your Macbook’s startup disk from the left panel and click Erase
In the format Pop-up menu, choose macOS Journaled or APFS if your Mac has a solid-state drive
Once the Erase process has completed, exit out of Disk Utility
Install macOS High Sierra or other macOS Versions
In this step here, you use the USB you created in the prior step to re-install an older macOS version on your MacBook
Plugin the USB Installer drive that you created into your MacBook
Restart Your MacBook and press the Option Key when it is restarting
When the Installer Disk shows up, Click Install ‘macOS High Sierra’ or the macOS version that you choose to download earlier. (Click Install disk icon)
Select ‘Install macOS’ and click on continue to proceed
Choose your Main MacBook Drive when prompted and proceed to install
Once the install is complete, restart your MacBook
After the install is complete, use your Time Machine backups to restore files to your MacBook
Verify that the install Completed successfully by checking the Installer log. You can access the install log from the ‘Install macOS High Sierra’ menu bar when clicking on Window and choosing Installer Log or press Command and L keys to launch the installer log.
You can choose ‘Show All Logs’ or focus in on ‘ Show Errors and Progress’ to make sure things are kosher during the install. One tip that is useful is to save the log file so that you can use it to diagnose any errors.
If for some reason, you choose to upgrade to macOS Mojave later, you can create a USB Installer as described above or use macOS Recovery (Command +Option+ R for older Macs built before July 2011 to start internet recovery process) to re-install macOS Mojave on your MacBook
We hope that you found this quick tutorial helpful. Please let us know if you have any questions or comments.
Obsessed with tech since the early arrival of A/UX on Apple, Sudz (SK) is responsible for the original editorial direction of AppleToolBox. He is based out of Los Angeles, CA.
Sudz specializes in covering all things macOS, having reviewed dozens of OS X and macOS developments over the years.
In a former life, Sudz worked helping Fortune 100 companies with their technology and business transformation aspirations.
just got a spanking new mbp 13 and gosh! what a let down. flickering screen from day 1, logic board changed and still occurring. was told it’s chrome, but it’s not indeed. from reading seems like it’s Mojave.
question: can I downgrade to High Sierra if machine was delivered with Mojave? thanks heaps x
Apple’s stance is that you cannot downgrade to an earlier version of macOS than originally shipped with your Mac. Contact Apple Support again and let them know you are terribly disappointed with the quality of the product and ask them what they are going to do about it since your Mac is currently covered by their warranty.
I had to plug in the USB drive first and restart the Mac while holding the Alt/Option key second. Otherwise, it suggests restoring the original version of the OS. Otherwise, the instructions are great and much appreciated!
If I have upgraded to Mojave, and done a TM back up. Once I have downgraded to High Sierra cannot I restore individual files from the Mojave TM backup… ?
many thanks
Richard
You should be able to restore individual files and folders. But you should not do a full disk restore from a backup made with Mojave.
If you have a backup made when via High Sierra, you can restore that backup and then restore any individual files or folders made after you updated to Mojave.
The latest (Mojave) update has crippled the scanner function and apparently there is nothing I can do to fix it, short of downgrading to High Sierra or earlier.
Since I only did Time Machine backups under Mojave, I’m out of luck.
Shame on Apple for not keeping the printer compatible – it worked fine before.
Now I probably have to toss a perfectly good printer and buy a new one.
I ended up using Install Disk Creator instead of Terminal to create a USB bootable installer but still would have been lost without the rest of your article.
One machine here will run Mojave, and the rest won’t – and I discovered iTunes and Photos on Mojave are not backward compatible with machines running High Sierra.


just got a spanking new mbp 13 and gosh! what a let down. flickering screen from day 1, logic board changed and still occurring. was told it’s chrome, but it’s not indeed. from reading seems like it’s Mojave.
question: can I downgrade to High Sierra if machine was delivered with Mojave? thanks heaps x
Hi Trish,
Apple’s stance is that you cannot downgrade to an earlier version of macOS than originally shipped with your Mac. Contact Apple Support again and let them know you are terribly disappointed with the quality of the product and ask them what they are going to do about it since your Mac is currently covered by their warranty.
Liz
I had to plug in the USB drive first and restart the Mac while holding the Alt/Option key second. Otherwise, it suggests restoring the original version of the OS. Otherwise, the instructions are great and much appreciated!
If I have upgraded to Mojave, and done a TM back up. Once I have downgraded to High Sierra cannot I restore individual files from the Mojave TM backup… ?
many thanks
Richard
Hi Richard,
You should be able to restore individual files and folders. But you should not do a full disk restore from a backup made with Mojave.
If you have a backup made when via High Sierra, you can restore that backup and then restore any individual files or folders made after you updated to Mojave.
If you want to downgrade for mojave the terminal command is slightly different, referring to the apple webpage https://support.apple.com/en-us/HT201372
the command is this:
sudo /Applications/Install\ macOS\ Sierra.app/Contents/Resources/createinstallmedia –volume /Volumes/MyVolume –applicationpath /Applications/Install\ macOS\ Sierra.app
I own a Samsung SCX-4623 printer scanner.
The latest (Mojave) update has crippled the scanner function and apparently there is nothing I can do to fix it, short of downgrading to High Sierra or earlier.
Since I only did Time Machine backups under Mojave, I’m out of luck.
Shame on Apple for not keeping the printer compatible – it worked fine before.
Now I probably have to toss a perfectly good printer and buy a new one.
I have a time machine backup from High Sierra and they told me at Apple I could just restore from Time Machine, which I am doing.
TM erases your destination disk as part of the process.
Can I downgrade from Mojave to High Sierra even if I didn’t make a backup before installing Mojave ?
Sorry Madhuro,
We don’t recommend downgrading to High Sierra from Mojave if you did not backup prior to updating macOS.
Sam
Thanks for very clear instructions.
I ended up using Install Disk Creator instead of Terminal to create a USB bootable installer but still would have been lost without the rest of your article.
One machine here will run Mojave, and the rest won’t – and I discovered iTunes and Photos on Mojave are not backward compatible with machines running High Sierra.