Played around with all the cool filters using Snap Camera but now about to enter (or already on) an important meeting only to discover that those fun filters are still enabled? And you really don’t want all your co-workers seeing you look like your dog, have a cat on your head, dressed up as an elf, or looking like a talking potato.
The good news is that it’s easy to get back to looking like normal, you just have to know the right steps!
First of all, if you are stuck with a filter you don’t want others to see, it’s likely NOT coming directly from your web conference, live streaming, or video chat app. Instead, you are probably using Snapchat’s Snap Camera app.
This app lets you apply different filters (they call them lenses) to alter the way your face looks while using your computer’s webcam.
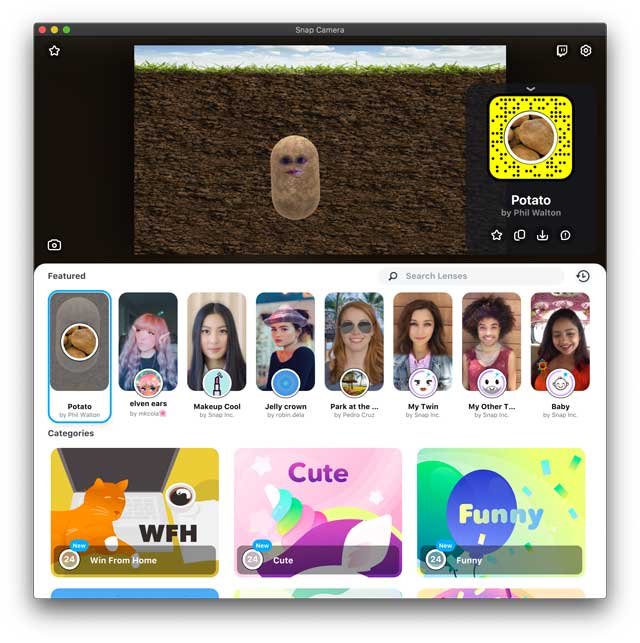
When you open the Snap Camera app, you see your current webcam view and previews of a bunch of these lenses (filters.)
To try one of these looks out, all you need to do is tap on a lens from the Featured section or search for something that interests you.
How Snap Camera’s lens works with your computer
What happens behind the scenes is that the Snap Camera app actually creates a virtual webcam on your computer.
So whenever you have the Snap Camera open, the app takes the input of your computer’s webcam and processes it with the Snap Camera lens (filter) you chose.
And that’s great for having fun alone or with family and friends.
But it may not be so great when you have important business meetings with your bosses or clients!
What app use Snap Camera?
Almost any app that uses your webcam can work with Snap Camera, including YouTube, Facebook Live, Zoom, Skype, Google Hangouts and Meet, Microsoft Teams, and a lot of other conference apps.
Snap Camera does not work on FaceTime–so that might be good news for some folks out there.
How to disabled Snap Camera’s filters and lenses
Quit and close Snap Camera’s app
Since Snap Camera creates a virtual webcam, if you close or quit the Snap Camera app it cannot process the filter onto your webcam.
Once you quit Snap Camera, it cannot alter your image in any way since the program that applies the filter is closed!
You can close Snap Camera a bunch of ways!
Choose Snap Camera >Quite Snap Camera from the top menu bar
Press the keys Command + Q for the quit keyboard shortcut
Tap Snap Camera from the Dock and right-click it and choose Quit (like the example above)
Change your app’s camera setting
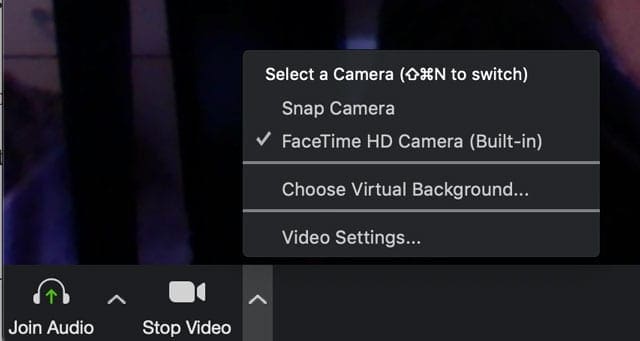
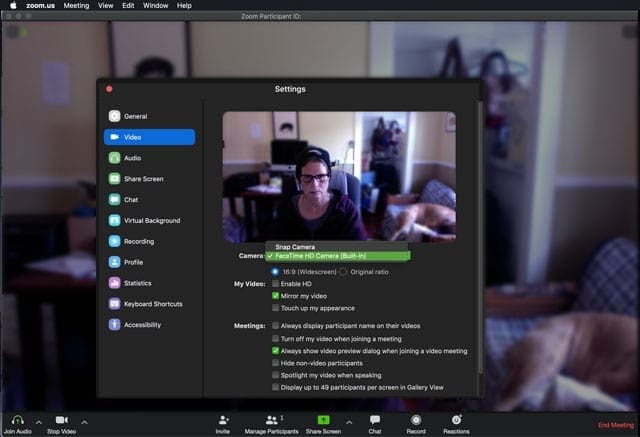
Inside your conferencing app, there is an option to choose which camera your conference app uses. If you see your Snap Camera filters applied to your image, then you selected Snap Camera as your camera.
The easiest way to change this is to tap the option for your camera or video feed and choose your computer’ s built-in camera.
Remember that since Snap Camera creates a virtual webcam, you should always see at least two options for your camera:
Snap Camera
Built-in
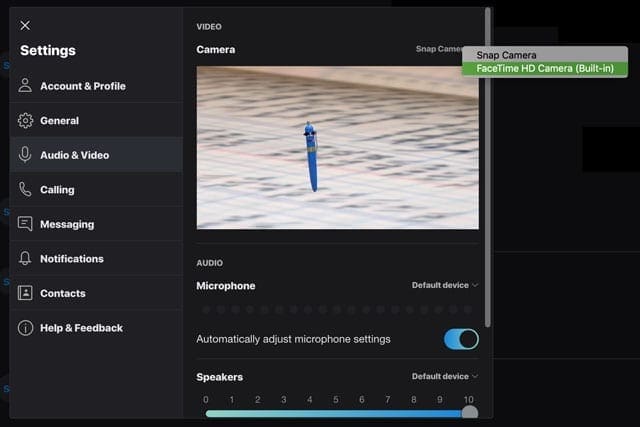
Can’t find these camera or video feed options?
Check the conference app for options in Audio & Video Settings or Camera Settings
Open the app’s preferences and look for Video or Camera options
Disable camera permissions (for Macs)
A third way to get those filters off your image is to disallow Snap Camera from accessing your camera.
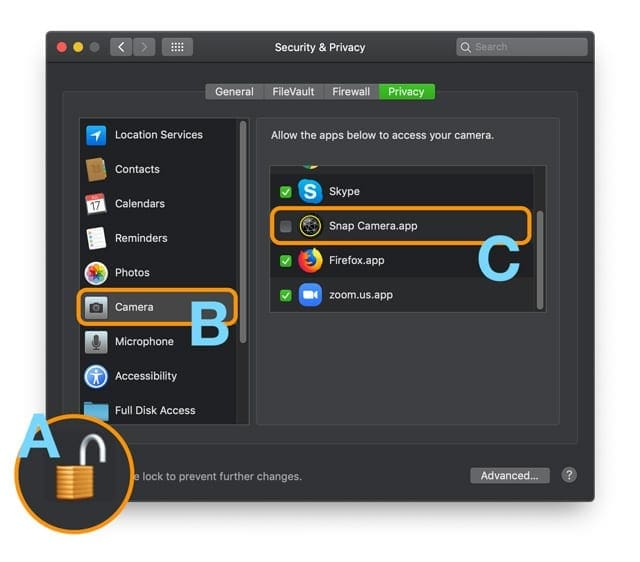
Open Apple Menu > System Preferences > Security & Privacy
Choose the Privacy tab
If you lock your Mac’s settings, tap the lock icon and enter your device password to unlock it
Tap Camera
Deselect the checkbox next to Snap Camera so it’s no longer checked
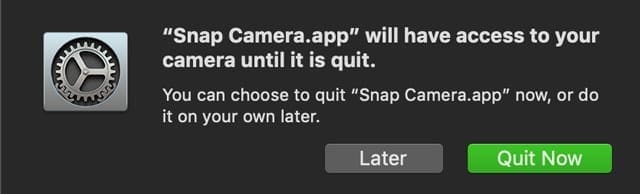
If the Snap Camera app is open, choose Quit Now
Relaunch your conference app and verify you got rid of those filters!
If you see a black or blank colored screen instead, go to the app’s camera or video settings and select your computer’s built-in camera
How to uninstall Snap Camera from your Mac
If you decide you’ve had your fun with Snap Camera and want to uninstall it completely from your Mac, follow these steps:
Close all apps that use your camera
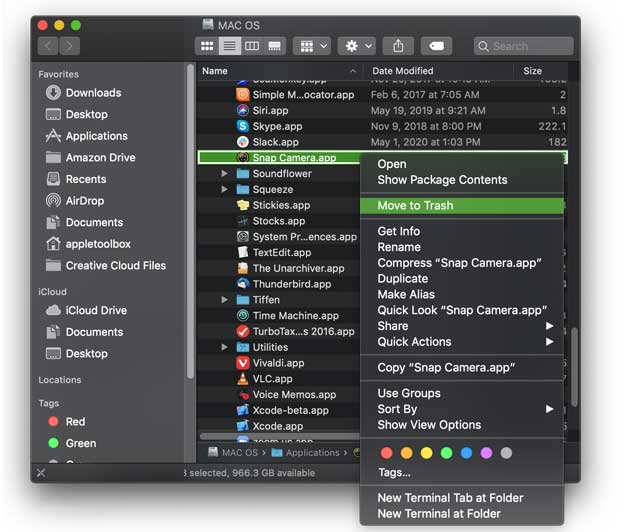
Go to your Mac’s Applications folder and right-click on Snap Camera
Choose Move to Trash
If asked, enter your password if and tap OK
Tap Yes when you see the prompt asking if you want to remove all of Snap Camera data
Restart your Mac
Still seeing Snap Camera’s virtual camera as an option after uninstalling the app?
If you followed the steps to uninstall Snap Camera but still get it as an option when selecting a camera in an app that uses the camera, follow these steps
Open Terminal in Applications > Utilities
Copy&Paste or type in the following Terminal commands:
For most of her professional life, Amanda Elizabeth (Liz for short) trained all sorts of folks on how to use media as a tool to tell their own unique stories. She knows a thing or two about teaching others and creating how-to guides!
Her clients include Edutopia, Scribe Video Center, Third Path Institute, Bracket, The Philadelphia Museum of Art, and the Big Picture Alliance.
Elizabeth received her Master of Fine Arts degree in media making from Temple University, where she also taught undergrads as an adjunct faculty member in their department of Film and Media Arts.
To delete SnapCamera, first make sure the app is closed. If you see it in your Mac’s Dock, right-click on it and choose Quit. If that doesn’t work, go to the Apple Menu and choose Force Quit, then select SnapCamera.
It’s also a good idea to close any app, including FaceTime that uses or used SnapCamera before proceeding with these next steps
Once you quit it, go to your Applications folder, locate SnapCamer, and right-click on it, choosing Move to Trash. Follow the prompts to remove it. Once removed, restart your Mac.
Then check FaceTime.
If the problem persists, close FaceTime and then follow these steps that use Terminal.
Open Terminal (Applications > Utilties > Terminal)


How can i use snapchat filters on other app like BOTIM on my iPhone 13
I cannot install it can you help me install it
Since I downloaded the app, when I enter Face Time on my Mac my camera appears all yellow and I can´t remove it.
I already tried from security & privacy but the camera option does not even appear, also it doesn´t let me delete the app.
In other apps like zoom and the photo booth, it works perfectly, only on Face Time is the problem.
Hi Valerie,
To delete SnapCamera, first make sure the app is closed. If you see it in your Mac’s Dock, right-click on it and choose Quit. If that doesn’t work, go to the Apple Menu and choose Force Quit, then select SnapCamera.
It’s also a good idea to close any app, including FaceTime that uses or used SnapCamera before proceeding with these next steps
Once you quit it, go to your Applications folder, locate SnapCamer, and right-click on it, choosing Move to Trash. Follow the prompts to remove it. Once removed, restart your Mac.
Then check FaceTime.
If the problem persists, close FaceTime and then follow these steps that use Terminal.
Open Terminal (Applications > Utilties > Terminal)
Copy and paste or type in the following commands:
launchctl remove com.snap.AssistantService
rm ~/Library/LaunchAgents/com.snap.AssistantService.plist
rm -r ~/Library/Caches/Snap/Snap\ Camera
rm -r ~/Library/Preferences/Snap/Snap\ Camera
osascript -e ‘do shell script “launchctl remove com.snap.SnapCameraRemover; rm /Library/LaunchDaemons/com.snap.SnapCameraRemover.plist; rm -r /Library/CoreMediaIO/Plug-Ins/DAL/SnapCamera.plugin; exit 0” with administrator privileges’
Press Return and if asked, enter your password
Restart your Mac and check FaceTime again
Let us know if this helps or not,
Liz
If you still see this problem
My Snap camera is OFF> I checked tasks and it is not listed.
My webcam just says snap camera when I open it (and does not work at all).
I can switch to see my own face but when I switch back – nothing but the snap camera logo.
I am on Windows 10.
Hi Chris,
Locate the Snap Camera app icon in your Window’s bottom taskbar and right-click on it.
Choose Turn off
Once off, right-click the Snap Camera app again and this time choose Quit
Then try opening up any app that uses your webcam and you should no longer see Snap as an option.