While modern smartphones have evolved beyond anything we could ever imagine, emails were one of their first features. Sending correspondences on the go has made it easier for people to arrange important meetings, send vital updates, and much more.
Related Reading:
- Apple’s Mail App iOS 16 Updates Explained
- The Best Email Apps for iPhone
- Mail Not Opening on iPhone or iPad: How to Fix
- Fix: Account Restriction – This iPhone Is Restricted From Creating Mail Accounts
- iPhone 13 Pro vs. iPhone 14 Pro: Should You Upgrade?
If you’ve decided to use the Mail app instead of Outlook or Gmail, this guide will help you out. We’ll tell you everything you need to know about using Mail on iOS.
Contents
- Setting Up Your Email Address
- Composing Emails
- Scheduling Emails to Send Later
- Replying to Messages
- Following Up on Emails
- Saving Attachments and Files
- Flagging and Unflagging Emails
- Muting Emails
- Moving Your Emails to Junk
- Blocking Senders
- Marking Emails as Read and Unread
- Moving Messages to Trash
- The Mail App on iOS Has Plenty of Useful Features for You to Enjoy
Setting Up Your Email Address
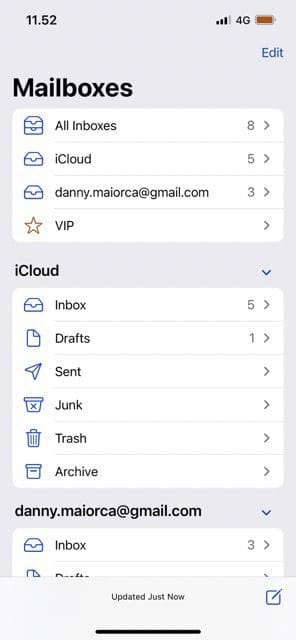
Of course, the most important initial step is to set up your email address on Mail. Doing so is pretty simple; once you’ve downloaded or opened the app, you will see the different mailing servers that the app supports.
Enter your email address and password. Once you’ve done that, you will be able to receive and respond to messages from the Mail app.
You can also set up your email account via the Settings app.
Composing Emails
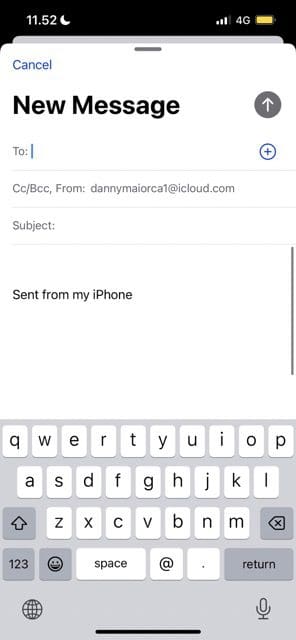
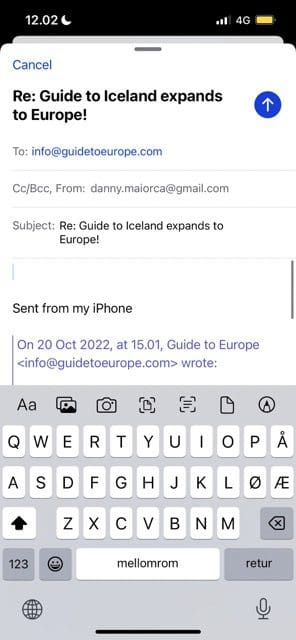
The main reason you’re using the Mail app is probably to send emails. Doing so is pretty simple; once you’ve signed into your account, go to the drawing icon at the bottom of your screen.
You’ll need to write the body of your email. Beyond that, you can add a subject line and your recipient — along with any addresses that should be CC’d in the correspondence.
Once you’ve put everything you need, you can hit the arrow icon in the top right. And if you want to remove the “Sent from iPhone” text, delete it like you would with any other form of text.
Scheduling Emails to Send Later
In iOS 16, Apple introduced a feature that would enable users to schedule emails for a later date. As such, you don’t need to worry about sending messages at the wrong time — or that someone won’t read it.
Scheduling emails in the Mail app on iOS is not too difficult. Instead of tapping the send icon, you’ll need to hold it down. Once you’ve done that, you can choose when you want the message to appear in the other person’s inbox.
You will need to ensure that you have an internet connection at the time you schedule your email for. Otherwise, it won’t send.
Replying to Messages
Of course, it’s pretty pointless having an email app if you can’t respond to messages you receive. When using the Mail app for iOS, replying to correspondences that need this is not too difficult. First, you’ll need to go to the folder that your message appears in.
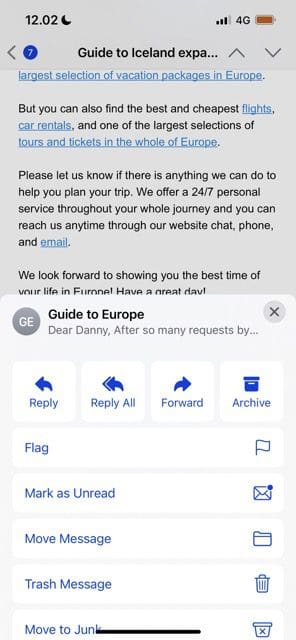
When you’ve found the message you want to reply to, select the arrow icon; it’s the second closest to the right at the bottom of your screen. There, you’ll see two options: Reply and Reply All. Choose whichever meets your needs.
< h2>Managing Your Email Inbox
Over time, you may find it difficult to keep your email inbox organized. Fortunately, you will have few issues with the Mail app on iOS. When using the app, you have access to plenty of tools that help you arrange everything as you need it.
You can create new mailboxes if you need to; simply go to Edit > New Mailbox. On top of that, it’s easy to archive emails — and to mark particularly important ones as VIP.
You can also easily move your messages to the trash folder, as we will discuss in more detail later.
Following Up on Emails
Sometimes, you won’t receive a response straight away. And while most things aren’t urgent, there are situations where you will probably want a quick reply — such as when you’re trying to arrange a meeting, or you’ve got a crucial deadline. Considering how many emails we send daily, keeping track of everything can become a challenge.
With the Mail app on iOS, you can follow up on some emails. The feature was introduced in iOS 16.
If you need to follow up on an email, you will sometimes see a Follow Up button. But even if you don’t see this, you can always send a message manually.
Saving Attachments and Files
Attachments and files are hardly a new feature in emails. Some of them are important, and as a result, knowing how to download these in the Mail app for iOS is a good idea.
Saving attachments and files can get a little tricky on Mail, but it’s still possible. In an email where you have an attachment, you can download it before tapping and holding on them. Select Save to Files, or — alternatively — you can click on Share. From there, you can AirDrop it to another Apple device if it’s in close proximity.
Flagging and Unflagging Emails
If you’re not ready to respond to a message, you might want to flag it so that it’s easy to identify later. And when using the Mail app on iOS, you will have almost no issues in this respect.
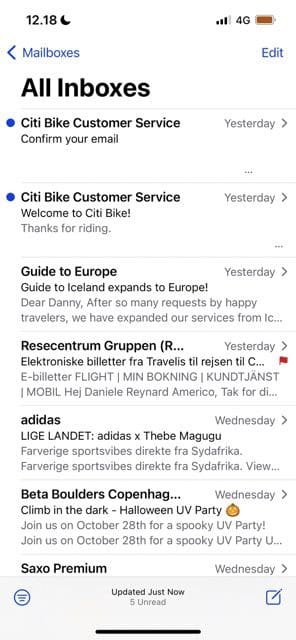
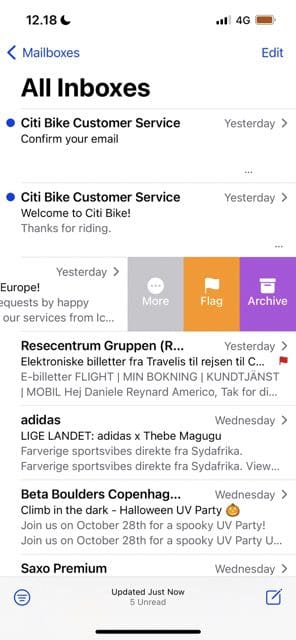
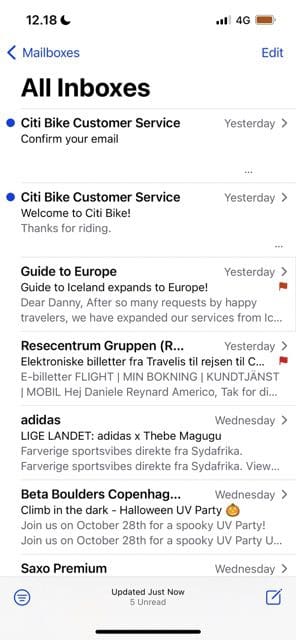
When you see a message you’d like to flag, swipe left to reveal a range of options. One of them is called Flag; click on this. You will then see a flag appear next to that email in your inbox.
To unflag an email, repeat the same process. But instead of hitting Flag, select Unflag.
Muting Emails
If you have the Mail app on iOS and you’ve downloaded iOS 16 or later, you can mute emails. You will find this tool especially helpful if you don’t want to receive notifications for correspondences or threads that you think are irrelevant.
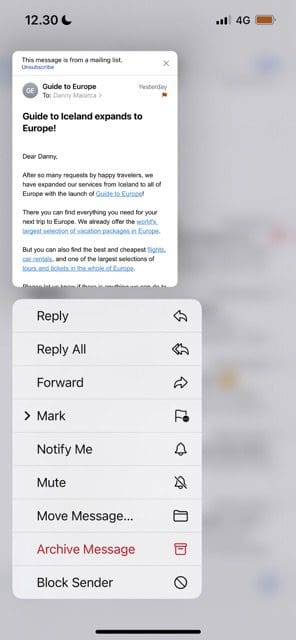
To mute messages on the Mail app, tap and hold the email you’d like to perform this action on. When the dropdown menu appears, select Mute.
Moving Your Emails to Junk
Let’s face it — many emails we receive are not worth our time. And if you want to get rid of annoying messages from your inbox, you can do so easily on Mail for iOS.
One way you can keep your inbox clean is by moving unwanted emails to the Junk folder. Tap and hold on the email you’d like to move to this folder, before selecting Move Message…. Choose Junk on the next window.
Blocking Senders
You will probably find that you don’t need to block email addresses that frequently. But it can be handy in several circumstances, such as if another person is harassing you.
If you need to block a sender on Mail for iOS, the process is not too hard. Tap and hold on an email that user has sent, before selecting Block Sender at the bottom of the dropdown menu.
Marking Emails as Read and Unread
Have you ever accidentally opened an email when you didn’t have the time to respond to it. If so, you’re not alone. Fortunately, it’s easy to mark the message as unread again when that happens.
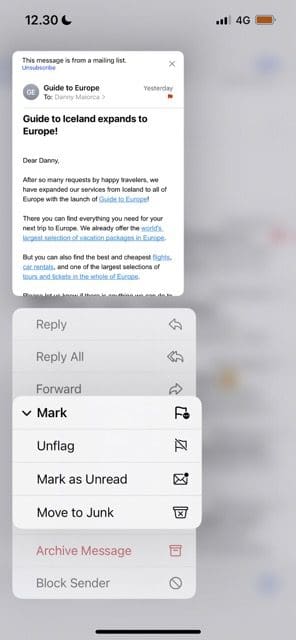
Find the email you want to mark as unread before tapping and holding on it. Then, select Mark. After that, choose the Mark as Unread option.
If you’d like to mark a message as read, follow the same procedure. The only difference is that you’ll need to click on Mark as Read instead.
Moving Messages to Trash
If you don’t want to send emails to the Junk folder but you’d still like to remove them from your inbox, you can always move these correspondences to Trash instead. Like many of the features already mentioned, you’ll need to tap and hold the email you want to bin — before selecting Move Message….
Hit Move Message… again, before selecting Trash.
The Mail App on iOS Has Plenty of Useful Features for You to Enjoy
This guide was supposed to help you with the initial steps of using the Mail app for iOS. You will find more features than you might otherwise have thought were available, and it may take a little time to get used to them. Setting up your email address is easy, and composing simple messages also doesn’t take too long.
With the Mail app, you can also easily send emails to the Junk and Trash folders — along with scheduling messages for sending later. Mail for iOS evolves year by year, so you will continue to find plenty of cool benefits in years to come.

Danny has been a professional writer since graduating from university in 2016, but he’s been writing online for over a decade. He has been intrigued by Apple products ever since getting an iPod Shuffle in 2008 and particularly enjoys writing about iPhones and iPads. Danny prides himself on making complex topics easy to understand. In his spare time, he’s a keen photographer.




Write a Comment