Your iPhone camera may occasionally take grainy pictures after installing the latest iOS updates. This glitch mainly plagues the front camera but it can also affect the rear camera. Basically, when you take a selfie in low light, your photos look fuzzy, and blurry without even zooming in. Apparently, your iPhone’s camera is unable to adapt to low-light conditions. As a quick reminder, the iPhone 11 was plagued by bad camera quality in low lighting when it was first launched. Many iPhone 12 users complained about similar issues, so let’s see how you can fix this problem.
Why Does My iPhone Camera Look so Grainy and Noisy?
Clean the Lenses and Remove All Accessories
Use a soft microfiber cloth and clean your iPhone’s camera lenses. Carefully inspect the lenses and check if there are any traces of dirt or debris. If the lenses are misaligned or you notice anything unusual, contact Apple Support for further help.
Additionally, if you’re using accessories that place a magnet near the camera, remove them and check if the issue is gone. Make sure your case is not blocking the camera. Take it off, and check if the issue persists. Restart your iPhone and check if your photos still look grainy.
If the issue persists, this means the grainy images are not the result of a dirty lens cover. Go to the next step and double-check your camera settings.
Tweak Your Camera Settings
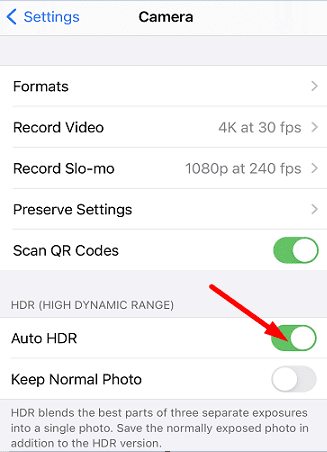
High ISO (HDR) and low light can lead to grainy photos. Navigate to Settings, tap Camera, and disable Auto HDR. Leave the HDR option off when using the Camera app. Rest assured, you can still control the HDR functionalities manually.
Many users complained the HDR function doesn’t work as intended under low light conditions on the latest iPhone models. After disabling Auto HDR, your Camera App should capture pictures at a lower ISO rating as it no longer needs the extra speed to take several shots of the object in order to add the HDR filter.
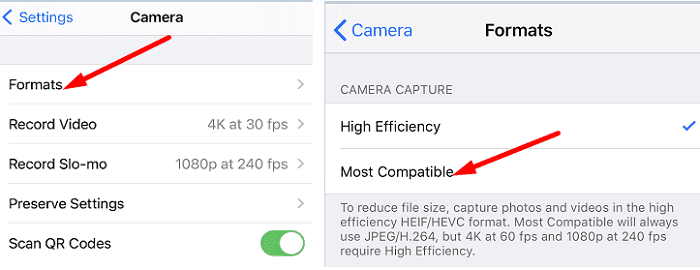
Additionally, go to Settings, select Camera, and then go to Formats. Enable the Most Compatible option (JPG).
Although the images saved using the JPG format are slightly larger in size, they are less grainy compared to the pictures captured using the High Efficiency option. Apple wants the iPhone to capture smaller-sized high-quality photos. Unfortunately, that’s not always possible under low light conditions.
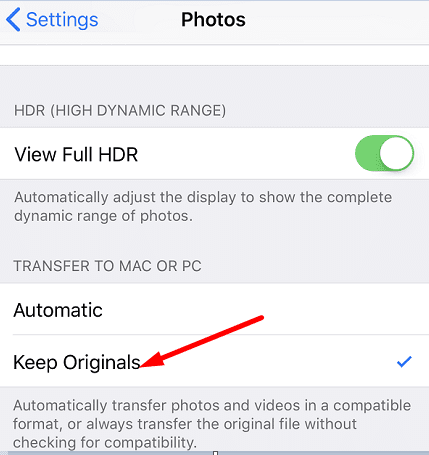
Then go back to Settings, tap Photos, and select Keep Originals when exporting the photos you took with your iPhone’s camera.
Additional Tips
Use the ultra wide camera with night mode turned on. Many users said this combo helped them lessen the noise.
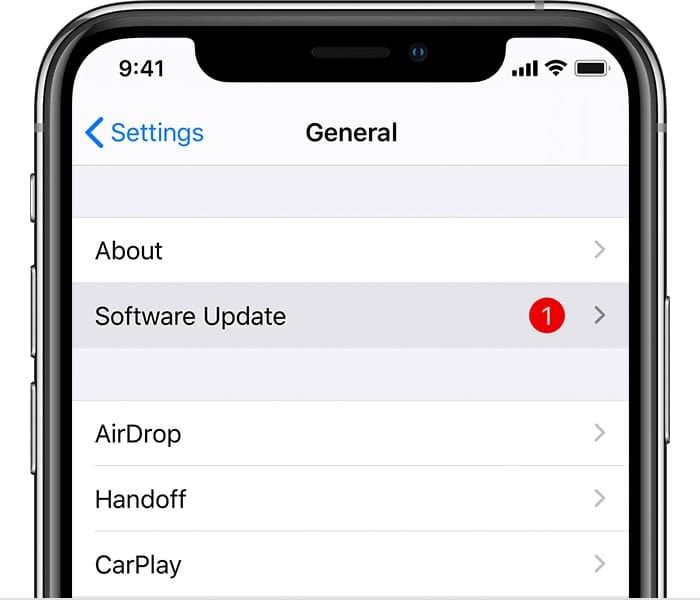
Update your iOS version. Go to Settings, select General and then tap Software Update. If this is a software-related issue, chances are that Apple may have already rolled out an emergency patch to fix it.
Make sure your device is running the latest software.
Force Restart Your iPhone
Many iPhone users who contacted Apple Support about grainy images were instructed to press the Volume Up and Down buttons and then turn off their devices.
First, you need to press the Volume up button and then quickly release it.
Then push the Volume down button and release it.
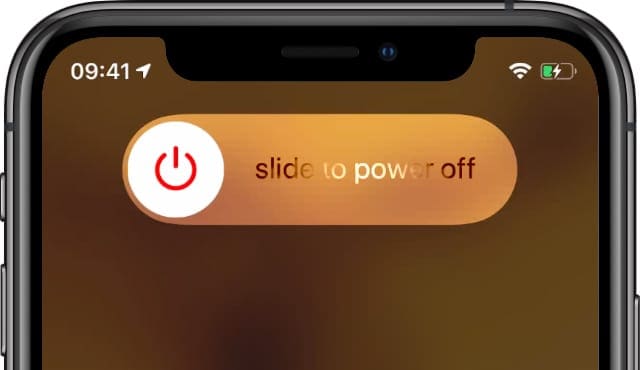
After that, press the side button and use the Power Off slider to turn off your iPhone.
Slide to power off and restart your iPhone.
Wait for 30 seconds, and hold the side button until your iOS device restarts.
Launch Photos, and take a few pictures using both cameras. Check if the images look sharp now.
Use a Third-Party App
Many iPhone users confirmed the Halide app helped them capture better images under challenging conditions such as low light. Halide and other similar apps take slightly bigger file size pictures. Simply put, less compression leads to clearer images. You can get Halide from the App Store. Use the 7-day free trial to test if the app really meets your needs.
Conclusion
If your iPhone takes grainy pictures in low light, check your camera settings. Disable Auto HDR, use the JPG format, and adjust the camera’s focus and exposure. Additionally, clean the lenses, and force-restart your iPhone. You can also download a third-party camera app from the App Store and use it to enhance image quality. Did these tips help you fix your iPhone camera issues? Share your feedback in the comments below.
Madalina has been a Windows fan ever since she got her hands on her first Windows XP computer. She is interested in all things technology, especially emerging technologies — AI and DNA computing in particular.


My 13 pro Max is not giving me quality pictures. After shooting the pictures come back dark and I really don’t know what to do.