If you’ve opted to get Apple’s first credit card, the Apple Card, then you’ll need to know how to manage that card and your account. Whether you decided to get the shiny titanium physical card or just stick with the digital version, here are some tips for keeping it all in order.
If you want to see your balance, credit limit, transactions, or anything else to do with your Apple Card, you can access two different ways. You can use either the Wallet app or your Settings.
Use the Wallet app
Open the Wallet app and tap your Apple Card.
You’ll see basic information on the main screen but can get further details by tapping the More (three-dot icon) button on the top right.
On the Apple Card screen, you can obtain card and credit details, add a bank account, change your billing address, and more.
Apple Card in the Wallet
Use the Settings app
Open your Settings and tap Wallet & Apple Pay.
Select your Apple Card.
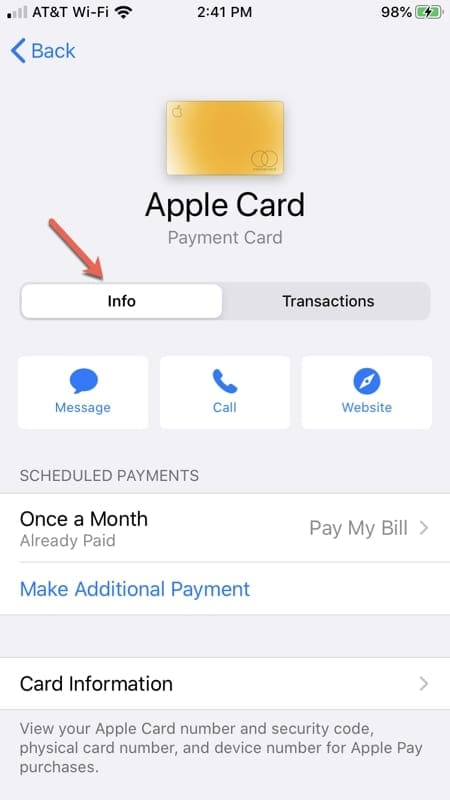
Tap Info at the top to obtain your account details just like in the Wallet app instructions above. Alternatively, you can tap Transactions to get activity details.
Apple Card in the Settings
Whichever way you decide to access your Apple Card account, the rest is basically the same with a few additional features available in the Wallet app.
View your transactions
You can see your latest transactions and their details with a tap. If you use the Wallet app to view your transactions, you can also take a look at the activity at the end of each month.
Tap a transaction to see full details of it including date, amount, and Daily Cash for when you use the card and date, bank, and status for when you make a payment.
If you have a problem with either using your card or a payment you made, you can tap to Report an Issue on the transaction detail screen.
View your transactions
Check your monthly spending
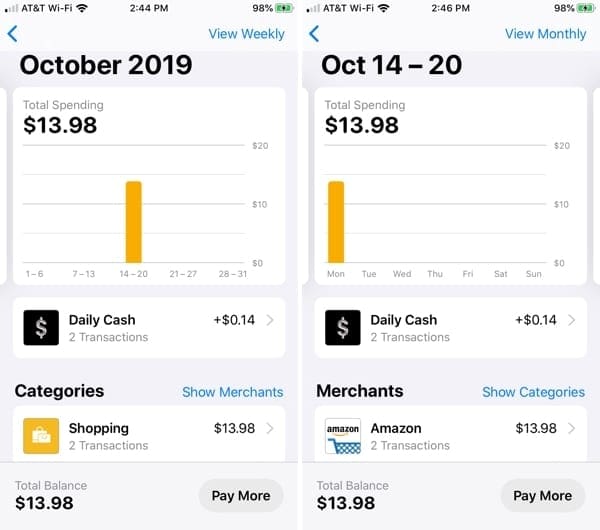
Apple Card gives you a cool way to check your spending from the Wallet app. After you tap your Apple Card, tap the small box for Monthly Activity.
Swipe right and left to move between months and tap View Weekly at the top to see activity by week instead.
You’ll see a handy bar chart at the top that shows you the date range and amount for your spending within categories like shopping or food and drink. Those categories are also listed at the bottom for you to delve into if you like. If you tap Show Merchants, the categories will change to display the merchants instead.
Monthly spending
By tapping transactions from this Monthly Activity view, you can get to the details as described above for viewing your transactions.
Download your statements
If you would like to save, share, or print your actual monthly statements from Apple Card, you can do this from the Wallet too.
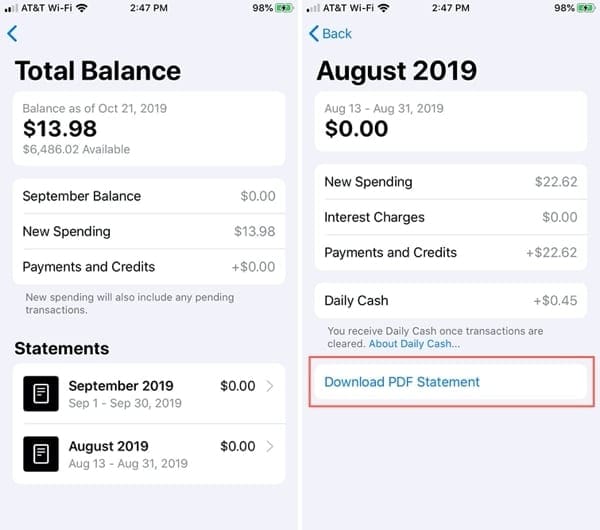
Directly above the Monthly Activity box on your Apple Card screen, tap the box for Total Balance. Along with a helpful monthly balance summary, you’ll see Statements at the bottom.
Tap to pick a statement and on the next screen, tap Download PDF Statement.
When the PDF displays, tap the Share button on the top right and then save, send, or share the file.
Tap Done on the top left when you finish.
Download a statement
Additional Apple Card actions
In the Settings app, open your Apple Card detail screen and tap Info at the top. Or, in the Wallet app, tap the More button.
You’ll then see your main Apple Card account information screen. Here is everything that you can do on this screen, and we’ll go into detail for a couple of the options.
Apple Card options
Message or Call for assistance with your Apple Card or visit the support website.
Make or schedule a payment (more detail below).
Get your card information (more detail below).
View your credit limit, available credit, and APR.
Add, edit, or remove bank accounts.
Make Apple Card your default payment for App Store, Apple Music, and Apple services purchases.
Enable notifications for transactions (more detail below).
View or update your billing address.
Review network benefits, the privacy policy, or terms and conditions.
Remove the Apple Card (this only removes it as a payment option; it does not close your account).
Schedule a payment
On your Apple Card screen, you can pay your bill by tapping Make a Payment. Plus, you have an option to set up scheduled payments. This is convenient so that you don’t risk forgetting to pay your bill because payments will be made automatically.
To set up scheduled payments follow these steps.
Tap Scheduled Payments and then tap Continue.
Schedule payments
Select a Payment Type from Pay My Bill, which pays your monthly balance, or Pay Different Amount, which pays an amount you choose. Tap Next.
Pick a Payment Date from When Payment Is Due, which is the last day of every month, or Choose Day, which lets you select the date you want. Tap Next.
Pick your Payment Type and Date
Confirm the card you want to use for the payment when it pops up at the bottom or pick a different one and verify your choice.
When everything is processed for your scheduled payments, tap Done.
Scheduled Payments set up
On your Apple Card screen, you’ll now see that scheduled payment and have an option to pay your bill outside of the schedule or make an additional payment if you like.
Note: You’ll receive notifications before and after your scheduled payment is made.
Cancel scheduled payments
If you want to stop the scheduled payments, tap the option you scheduled on the Apple Card screen and then tap Cancel Payments and confirm.
Cancel payments
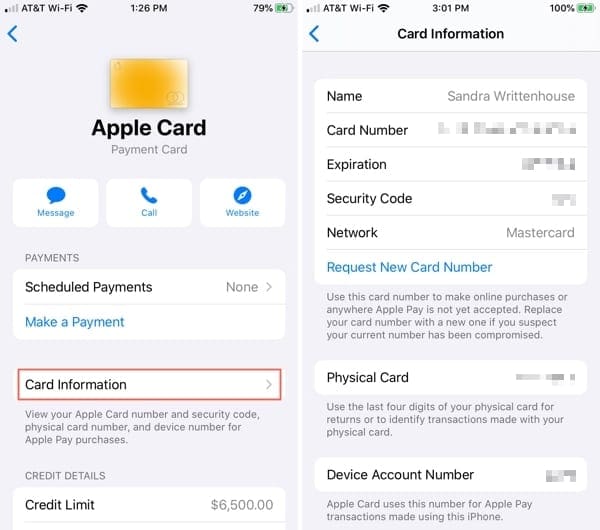
Get your card information
The Card Information section on the Apple Card screen is where you’ll head if you need your card number, expiration date, and security code. This is handy to remember if you want to use your Apple Card to pay for an online purchase.
You also have an option here to request a new card number if necessary.
Apple Card information
Enable transaction notifications
To receive updates like payment reminders and spending summaries, it’s a good idea to enable the notifications for your Apple Card. This should be turned on by default, but if not, you can turn it on in a tap.
Scroll down to Transactions and turn on the toggle for Allow Notifications.
Enable transaction notifications
Managing your Apple Card and account with ease
As you can see, Apple has made it super simple to manage your Apple Card and account right from your device. From contacting Apple for help to disputing a charge to seeing patterns in your spending, there are a great number of helpful features for your Apple Card.
What are your thoughts on the features available for managing your Apple Card and account? Have you found something missing or a feature that you’d like to see? Let us know what you think in the comments below!
Sandy worked for many years in the IT industry as a project manager, department manager, and PMO Lead. She then decided to follow her dream and now writes about technology full-time. Sandy holds a Bachelors of Science in Information Technology.
She loves technology– specifically – terrific games and apps for iOS, software that makes your life easier, and productivity tools that you can use every day, in both work and home environments.
Her articles have regularly been featured at MakeUseOf, iDownloadBlog and many other leading tech publications.
I use the eMoney Advisor website as a primary financial management tool. Among other functions, it allows me to aggregate all of my financial accounts and transactions from banks, credit cards, loans, investments, insurance, etc. How can I enable Apple Card transactions to be accessed by a third party like eMoney Advisor?


")


I use the eMoney Advisor website as a primary financial management tool. Among other functions, it allows me to aggregate all of my financial accounts and transactions from banks, credit cards, loans, investments, insurance, etc. How can I enable Apple Card transactions to be accessed by a third party like eMoney Advisor?