Time Machine is an excellent tool for backing up your Mac. But if your external Time Machine drive runs out of space or starts to fail, you might need to transfer those backups elsewhere. In this post, we’ve shown you how to do just that.
Time Machine saves snapshots of your Mac from the past days, weeks, months or even years. If you want to keep those snapshots, you need to transfer them to a new drive using the process we’ve described below. Thankfully, the process has become much easier in recent years.
Once your Time Machine backups are on the new drive, it behaves exactly like the old one did. That means you can make new backups or you can open Time Machine itself to recover lost files from last week, last month, or even last year, depending on when your backups started.
Transferring your Time Machine backups to a new drive is a great idea if your old drive is failing, if you need more storage, or if you want to archive your backups.
But sometimes people spend time transferring backups when they didn’t need to. We’ve detailed a couple of reasons for that below.
How Do I Transfer Time Machine Backups to a New Drive?
Transferring Time Machine backups to a new drive has become a simplified process, and you can follow the instructions listed below to achieve the result you’re looking for.
Connect your external hard drive to your Mac. In some cases, you might need to use an adapter if the USB ports don’t fit together.
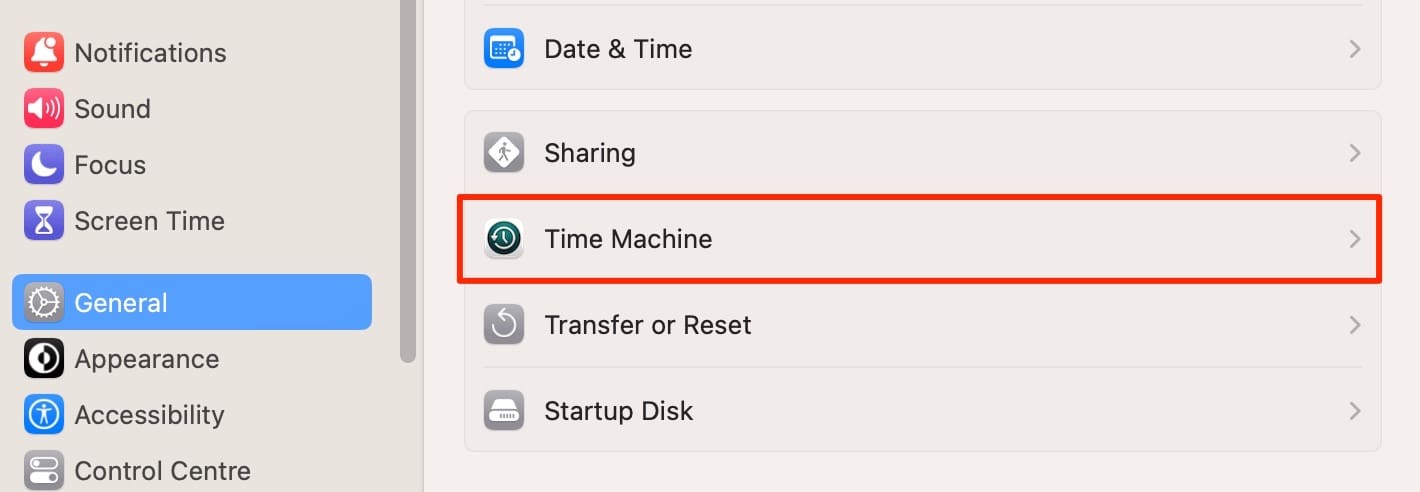
After connecting your external drive, go to System Settings > General > Time Machine.
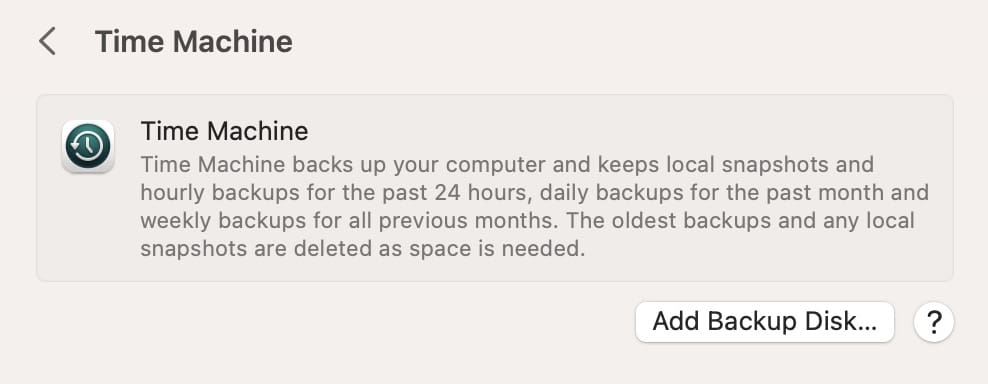
Choose the Add Backup Disk option.
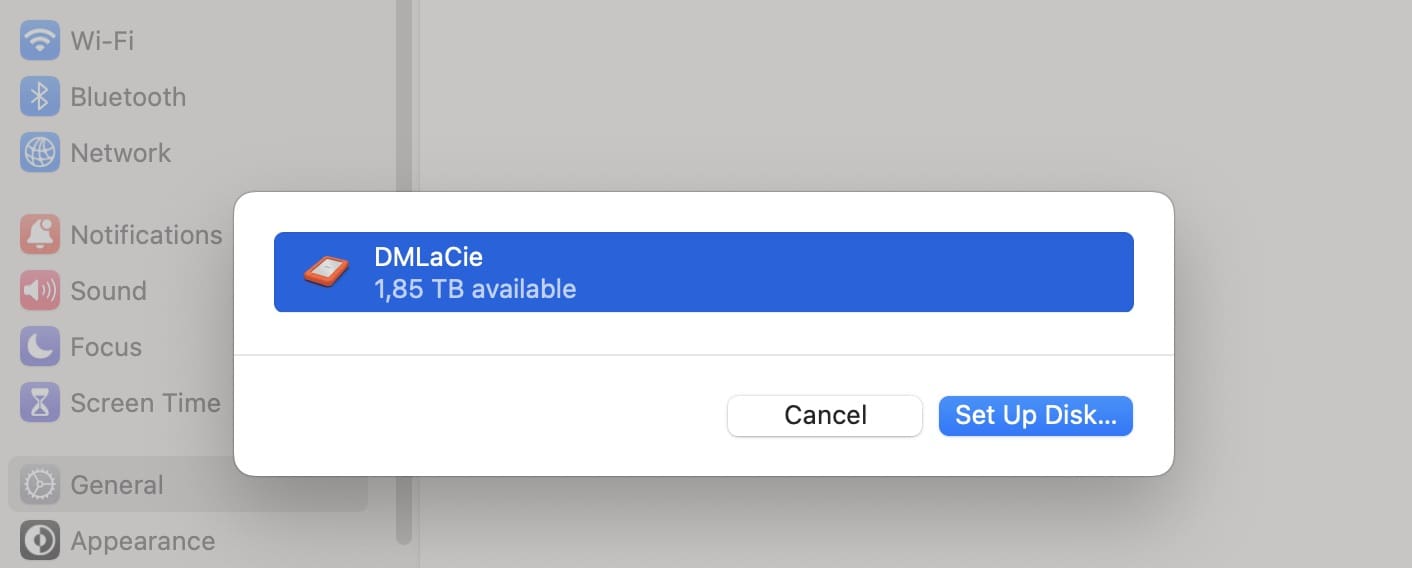
Pick the drive you want to use and select Set Up Disk.
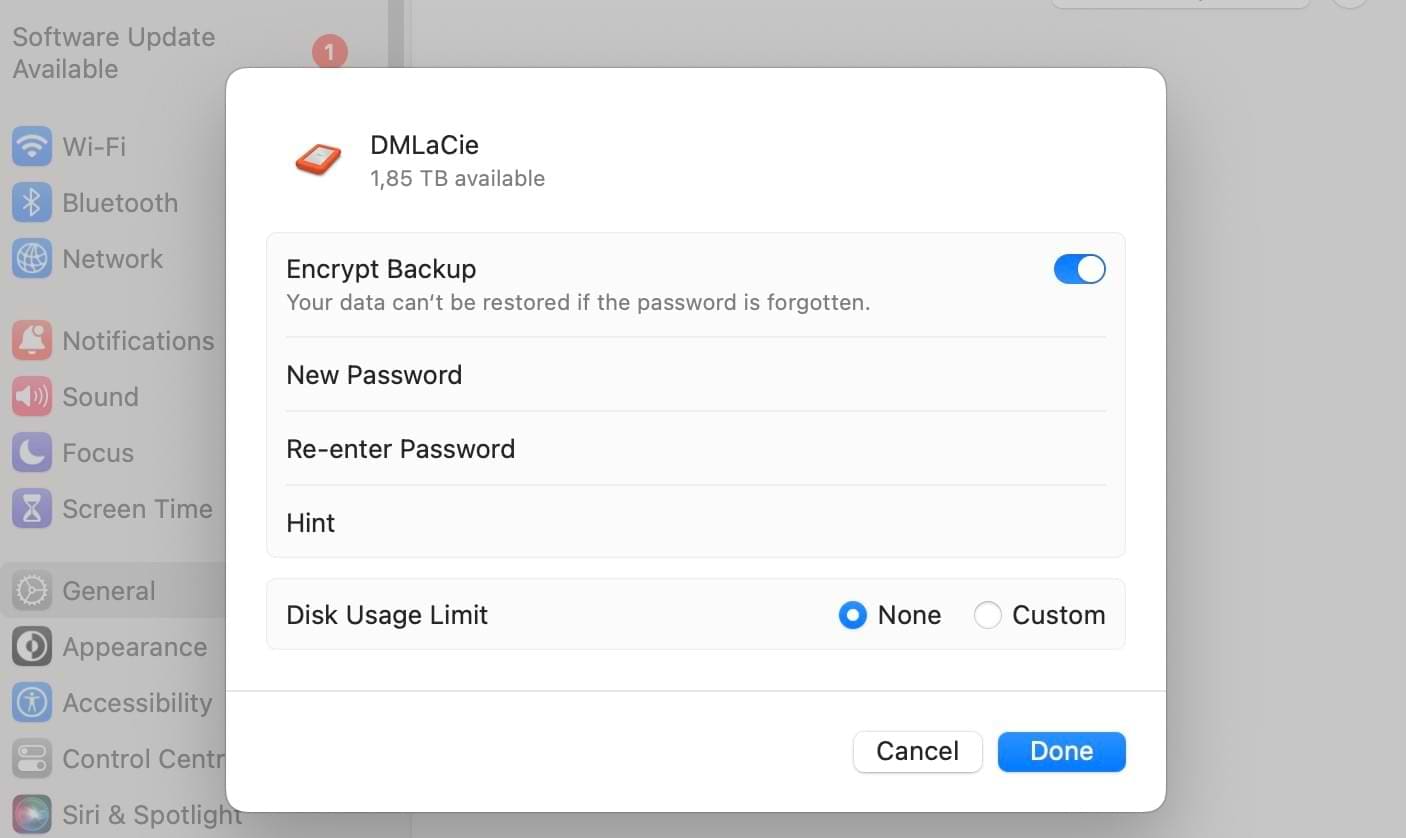
Customize the settings on your hard drive and enter/re-enter a password, plus a password hint if you feel it’s necessary. You can also toggle the Encrypt Backup feature on if that’s what you want to do.
After customizing the settings in the pop-up window, hit Done.
Problems Transferring Time Machine Backups to a New Drive?
If you’ve got problems transferring your Time Machine backups to a new drive, try these tips.
Make sure you log into your Mac as an administrator.
Check for any case sensitivities on your drive names and change these if needed.
Create a same-sized partition on the new Time Machine drive as your older backup drive for the transfer, and then resize after the transfer completes.
Use These Tips to Back Up Time Machine
Backing up your Time Machine files to a new drive is pretty simple, and you should now have all of the information you need to perform the entire process. Before choosing an external drive for this, make sure that it has enough storage space.
It’s also a good idea to still continue backing up your files elsewhere, such as in iCloud. That way, you’ve got more choices for recovering lost data.
Danny has been a professional writer since graduating from university in 2016, but he’s been writing online for over a decade. He has been intrigued by Apple products ever since getting an iPod Shuffle in 2008 and particularly enjoys writing about iPhones and iPads. Danny prides himself on making complex topics easy to understand. In his spare time, he’s a keen photographer.
Great.
An article titled, “Transfer your Time Machine Backups to a New Drive With This Guide” that never actually answers the question, How to, “Transfer your Time Machine Backups to a New Drive With This Guide”.
cp?
drag and drop?
ditto?
Carbon Copy Cloner?
SuperDuper?
Where’s the actual instructions to do the transfer? All I can see is how to set up a new disk but nothing about moving the files over. The guide doesn’t explain how you get your old backups onto the new disk. Are they hidden behind all the adverts or is the site just not compatible with Safari? I guess I’ll need to look elsewhere…
Hi:
To pre-empt problems due to disk failure, I want to make a duplicate copy of my Time Machine backup files. I cannot find instructions for this task. I’m running Catalina (Mac OS 10.15.7) on a 27-inch, late 2013 iMac. None of the web instructions matches my Mac/OS. Do you have any suggestions? Thanks.
Mel Comisarow
All you need do is:
Choose Apple menu > System Settings > General, then click Time Machine. Click Add Backup Disk, select the backup disk, then click Set Up Disk.
That doesn’t work either. It just sets up the new disk. You didn’t explain how to transfer the old backup to the new disk, and neither does the page you linked to. Did you misunderstand the question?
thanks for this detailed guide!!!
Apparently this isn´t working anymore on newer MacOS Versions. I have a M1 MBP with Mac OS Monterey and wanted to move my backups from my current 2TB SSD to a 5TB HDD (due to the lack of free disk space) and it is not possible following this guide copying the files. The files are also not organised in a backup.db folder … instead they are organised as snapshots. I also tried to copy the data in disk utility which failed. The thing is, that i really want to keep the old backups.. but i also want to move the data from the SSD and use it for other purposes. Is that really not possible in newer Mac OS Versions?
Thank you!!!
After about 2 days the file successfully transferred but when I went to set up the new drive as a time machine back up, time machine gives me the error that my new drive is not empty and needs to be erased prior to using as a time machine back up. Any idea how to circumvent this?
I cloned the imac internal hard disk to external Samsung T5 SSD drive and used as start up to speed up. It is working well but my MS Office Word, Excel, etc needs activation and license number. So I had to revert back to old hdd to start up..
How can I resolve this issue?
Why is it that you type way too much more than enough to describe something supposed to be simple in just a few step ?? This makes us hate your website regardless of what it is. We are not going to visit again by trying to make us stay longer on your page! We just exit and look for something more simple.
I’m sorry but this is horribly rude. I literally needed just about every instruction he provided. The article was perfectly detailed to ensure any issues that may pop up were taken care of. Nothing about the process for me was simple so don’t assume that because your process was simple that everyone has that experience.
I’ve been in IT for 45 years, mostly mainframe related. Still I should have known better… but … I followed these instructions (Steps 1 thru 6), without having read the subsequent paragraph. For people like me, some of the info in the “Problems …” paragraph should be put up-front (e.g. like doing this procedure as a Mac administrator). My practice is to always log on with a userid that lacks admin privileges, and just authenticate whenever a task requires admin rights. So the jury is still out as to whether this very time consuming process actually worked correctly.
This transfer was done on my 21.5″ 2017 iMac running High Sierra, and took nearly 42 hours to “prepare files to copy” and another 35 hours to then copy the 5,442,nnn non-encrypted files.
FYI, I was doing this because my 1TB TM drive had only 16GB left. So I copied everything to a 2TB drive, which I plan to use as the TM drive for my new 24″ iMac M1. My old iMac will be wiped and sold, but all of its historical TM backups will hopefully be accessible on my new iMac. That was my theory anyway. Fingers crossed 😉
I don’t know how long Finder would have taken to build the file list from my total of 130 Time Machine backups of 440GB each. This did not seem to me to be a sensible approach.
A number of people reported failure when attempting to clone the partition instead. I was, however, successful using Clonezilla, which is free cloning software from Taiwan and which on previous occasions I experienced as very reliable. Since Clonezilla requires booting from a USB stick or a CD, it will make your computer unavailable for any other task for the duration.
I don’t know (yet!) whether Clonezilla would work on an Intel-Mac, since did it on a PC laptop (my backup drives are USB-external). Initially I only cloned the partition used for Time Machine, but that rendered the clone un-mountable (no idea why), at least under Linux with HFS+ (didn’t try to mount and/or repair it on the Mac). I then cloned the entire disk (the target disk is new) and that worked.
It took just under 3 hours to clone the 1.4TB Time Machine partition from one USB-3 disk to another. This was 100% successful, and Time Machine works fine with the cloned drive.
–Clonezilla works on Intel Macs ! –
I have used Clonezille on an Intel MacbookPro with no problems. Just started up from a Clonezille-DVD from an USB-connected DVD-Drive.
Does anyone have experiences with M1 /M2 Macs and Clonezilla?
Brilliant instructions. I’ve been using Macs for years but often instructions don’t start at the beginning, whereas these tell me where to find what I need and even give me an image.
I had a problem with one file but ignored it and hope all is well.
Needed to install 4 tb as 2 tb was full and didn’t want to exclude any files from Backup.
Many thanks.
Hi Dan,
I am backuping my TM to Synology NAS and there is a file with extension – *.backupbundle.
When I look into the package contents, there are folders/files but unable to use it directly. There are many 256MB size UNIX file inside the bands folder.
Is there any 3rd party tools that can convert them into the normal file? Thx.
Hi,
I have a 2015 macbook pro and am running High Sierra 10.13.6.
I recently copied my Backups.backupdb folder from my Toshiba HDD (named TOSHIBA BACKUP to a WD HDD, with a view to erase the Toshiba and encrypt it, then transfer my TM backups back to the Toshiba.
1. I formatted the WD to MacOS Extended (Case-sensitive, Journaled). There was no option for Journaled HFS+ there. Named it “HW backup”
2.I successfully copied the Backups.backupdb to the WD “HW backup” then successfully changed the backup drive on Time Machine, then after a subsequent backup, opened TM and tried to see if I could access my past backups from 2018 on the new WD HDD. I could see them all there but didn’t realise until later that I couldn’t access any of the older backups from before the file transfer.
3. I wiped the Toshiba and formatted as MacOS Extended (Case-sensitive, Journaled, Encrypted), named it “Toshiba backup”
4. I copied the Backups.backupdb folder back to the now encrypted “Toshiba backup” drive.
5. I switched TM back to Toshiba backup drive, and the same thing happened, I could see the older backups but not access them.
Looking over this blog, I see that though I followed most of the steps, both drives did not have the same name when I transferred the Backups.backupdb folder, and the format of the WD was not the one specifically mentioned in the blog, though Journaled HFS+ was not an option in my disk utility.
Should i try any of these options?
– Verify that your Time Machine drive’s desktop icon does not show up as a green TM backup icon but rather the standard yellow disk icon [It is green. How do I change it? Is this too late?]
– Check for any case sensitivities on your drive names [What does this actually mean?}
– Rename the new TM backup drive the exact same as the old TM (and change to a new name after transferring your backups, if desired) [Is it too late if I’ve already copied the data from a drive called “TOSHIBA BACKUP” to a drive called “HW backup”?
I read many blogs and reviews that say Finder is not a good method for cloning. I tried several alternatives but finally have to agree that Finder is indeed the best free solution for copying Time Machine disks. I find it annoying that it has a long ‘preparation’ step with no progress indication and does not confirm when copy is complete (it just closes the window), but it does show progress when actually copying.
It is important to format the new Time Machine disk correctly first to MacOS Extended (Journaled) as Finder will not warn you of a wrong format; you will only find out it does not work when you try to activate it in Time Machine.
Here is a summary of all my trials, all on MacOS Catalina on an iMac with 3.2MHz quad core i5 processor (nothing extraordinary). It took around 6 hours to copy 1Tb.
Program Result Notes
Carbon Copy Cloner NOT SUITABLE Refuses to copy Time Machine drive
ChronoSync NOT SUITABLE Looks like a good way of synchronising folders, but will not copy a disk
Disk Unitly (included in MacOS) NOT SUITABLE It did not work. Backup 2 is “not valid for restoring”.
Do Your Clone NOT FREE for cloning Looks simple to use, but requires activiation to clone.
EaseUS Todo NOT SUITABLE Does backups, not cloning
Finder (included in MacOS) Works OK, though not perfect. Annoying ‘preparation’ step after which user interaction required before copying, but does copy reliably and gives progress bar with time estimated to complete. Does not confirm completiojn (progress bar disappears when finished).
Stellar Drive Clone NOT SUITABLE Will not run on a 64-bit machine!
SuperDuper FAILED Started OK but does not give estimated time remaining. Stopped part way for no apparent reason!.
True Image NOT FREE for cloning Cloning only available in the full version
I was running into the same issue and after hours on the phone with Apple, we figured out what the issue is. Apparently you cannot directly transfer TM backups from one HD to another, which in my case means I’m going out to buy a new external HD because even individually they’re too large for my internal HD.
Copying existing backups.backupdb folders to a brand new, properly formatted partition, on a brand new drive. left an additional 50GB of space over the size of the backups.backupdbfolder to be on the safe side.
It spends a dozen or so hours calculating the copy and then declares it has run out of space after only three of the backup sessions have actually copied.
Oddly, those backups.backupdb folders were originally copied without a problem to their current location.
It appears that the copy is expanding every hard link, file or folder, into a full duplicate of the original files.
Doesn’t work on 10.14.6.
Followed all steps and have the same issues like most of you:
After copying all items the finder window shows: remaining 5 seconds
But it doesn’t stop copying til copy process ends with “not enough space on target drive”.
Example: My source is tm-backup with 1 tb (drive 1 tb)
Target 2 tb empty drive.
After copying 2 tb (!!! – don’t know, what is copied after finishing all objects:) and taking hours, copy process crashes.
(Attempts with CCC, DriveImage also fail)
Thx for inputs…..
I have exactly the same problem under 10.14.6. Dragging Backups.backupd to the destination drive fills it up completely – after many hours –, and then fails.
But restoring the target disk from the TM source disk with disk utility works, and is even faster. Although this seems to be a No-No according to Apple support.
Yes try again. But this time, close all open apps then shut down your Mac. Wait a minute or so and power it back up–then try the transfer.
Follow these steps:
Check that the format of your new backup drive is Journaled HFS+ and the Partition Map Type is GPT (GUID Partition Table).
Set permissions on your new backup drive
Temporarily turn Time Machine off
Copy your backup data from your original drive to your new drive
Open a Finder window. In the Finder’s sidebar, click the icon of the original backup drive.
Open another new Finder window. In the Finder’s sidebar, click the icon of the new backup drive.
Drag the folder “Backups.backupdb” from the original backup drive to the top level of the new backup drive.
Enter your administrator name and password, then click OK to start the copying process.
Copying your backup data often takes a lot of time to complete so be patient on this step.
Finally, set Time Machine to use your new external drive
reformatted the disk, it shows the Journaled HFS+ and the Partition Map Type is GPT (GUID Partition Table)….set the permissions…now, when i drag and drop the backup folder to the brand new drive it says “the volume has the wrong case sensitivity for a backup”.
No this is not fun for a Friday night’s activity. We’re so sorry that this isn’t working for you.
What macOS or OS X version are you working with? To find out, go to the Apple menu at the top-left and choose About this Mac.
There is a bug in earlier macOS versions (prior to some macOS 10.13.4 –that’s High Sierra) that causes Time Machine issues–so that could be the problem.
If Time Machine continues to fail, you could also use a third-party application like Carbon Copy Cloner or SuperDuper.
deedeesays
reformatted the disk again but this time with ‘case sensitive journaled’ option….trying again to copy the files over….didn’t do the Sharing and Permissions thing cause that “ignore ownership on this volume” checkbox and text no longer exists. this is fun….i like spending my friday evening doing dicey file transfers. is there any consensus on LaCie drives? maybe that’s my problem? i mean, one is failing and that’s why i have to do this in the first place.
it’s still copying this morning….says it’s done 50.31 GB of 409.66….says there is 4 hours left. it’s acting exactly the same way as the last copy. my guess is that this will fail as well.
Oh gosh, what a pain! I am so sorry DeeDee. Let me look into this more for Mojave.
One thought: name the new hard drive exactly the same as the old hard drive–that might help.
deedeesays
yeah, the same thing happened. it copies all the files 409.66 gb and then keeps going….and the total amount of files starts increasing along with the remaining files to copy.
I canceled with both the files and the remaining files were at 500gb. so strange! I’m going to call lacie and see if they will just give me the replacement drive for free.
deedeesays
i’m trying SuperDuper per your suggestion. i’ll report back if/when it is done. 🙂
Oh my goodness, this is terrible for you! We are so sorry.
We can also try using Disk Utility to copy over your old TM drive to your new TM drive. And I’ll outline those steps below.
However, since you’ve had multiple failures with Finder and now with SuperDuper, you may want to reach out to Apple Support or SuperSuper support and see if they have additional options and/or can walk you step-by-step through their processes.
How to copy TM backups using Disk Utility
Set the permissions on your new TM drive
Choose Get Info on the new drive in Finder
Verify that Ignore ownership on this volume is unchecked
Open Disk Utility from either Applications>Utilities>Disk Utility or by restarting in Recovery Mode (Command+R keys)
Ensure again that your new TM backup drive is macOS Extended Journaled and GUID partitioned
If using Disk Utility from normal start-up (not recovery mode), turn Time Machine off
In Disk Utility select your new TM backup drive
From the Edit menu item, choose Restore…
From the next menu, choose your old Time Machine disk
Wait for Disk Utility to Restore your old TM backup to your new TM backup drive
If you used Disk Utility from Recovery Mode, restart into standard mode
Check your new drives permissions again, making sure ignore ownership on this volume is unchecked
Open Time Machine in System Preferences and select your new drive to backup to
Run a test backup to your new TM drive
Let us know if this works for you or if you contacted Apple Support or SuperDuper support.
Fingers crossed something gets this done for you!
Liz
Jensays
Have you seen any cases of old backups not showing up at all with the new drive even though I finished all the steps? Does transferring just some portion of the files matter?
No, we have not heard that particular issue before.
Make sure you keep your older drive intact before you erase anything. If you haven’t already done this, shut down, wait for a few minutes and then power up your Mac.
See if after that reboot if your new Time Machine backup drive now correctly shows your TM backups.
If it still isn’t showing up, as long as you have your old TM backup drive, erase and reformat the new drive and run through the steps again. Make sure all other apps are closed and that you don’t use your Mac for other things to allow it’s full processing power to do to your TM drives.
My time machine backup is on a RAID alongside many other files, 2 computers in my DB, going back to 2014.
My Time Machine backup file is 1.62 TB. My raid is failing, so I need to move my backups. I’m attempting to put them on a 4 TB drive (USB 20 – slow).
I’ve followed Apple’s instructions to the T.
The backup takes 24 hours to prepare, 24 hours to copy, then hangs at 5 seconds.
I gave up the first time after a few hours of 5 seconds, but then I decided to try again and wait it out.
Both times, after finished, the files in my backup date from 7/2014 – 02/2015.
However, the 2nd time, when I waited it out, I got an error that copies 4 TB and I’m out of disk space. (from a 1.62 TB original backup file).
But then when I look at the files that copied, 1.62 TB shows as copied (matched original size, but 2/2015 – 2/2020 files missing!). I’ve turned off the target drive, unmounted and remounted, to no avail.
It’s 2020 and there are years worth of backups that I need to copy before my RAID permanently fails.
I would do a disk clone, but my backups are alongside files and not their own partition, and I don’t have an external drive large enough for that!
This excellent article presents terse Apple Support articles in a clear, expanded format.
Unfortunately, under macOS Catalina, this fails.
I’m running 10.15.2. after 6 hours of file inspection (2.3 million files) phase one ends. This phase has written some info to the destination volume.
The actual file copy starts and quickly fails with a file permissions error from the finder.
I’m assuming that some further external disk permissions error must be processed.
10.5.2, same failure after 3 days… its not working. Get about 20% of the files transferred and then it fails saying I don’t have permission. Opened a case with Apple already.


Great.
An article titled, “Transfer your Time Machine Backups to a New Drive With This Guide” that never actually answers the question, How to, “Transfer your Time Machine Backups to a New Drive With This Guide”.
cp?
drag and drop?
ditto?
Carbon Copy Cloner?
SuperDuper?
Aw hell… let’s just leave it a mystery.
(Worthless article.)
Where’s the actual instructions to do the transfer? All I can see is how to set up a new disk but nothing about moving the files over. The guide doesn’t explain how you get your old backups onto the new disk. Are they hidden behind all the adverts or is the site just not compatible with Safari? I guess I’ll need to look elsewhere…
Hi:
To pre-empt problems due to disk failure, I want to make a duplicate copy of my Time Machine backup files. I cannot find instructions for this task. I’m running Catalina (Mac OS 10.15.7) on a 27-inch, late 2013 iMac. None of the web instructions matches my Mac/OS. Do you have any suggestions? Thanks.
Mel Comisarow
This is outdated advice and really complicated. GO to this apple webpage:
https://support.apple.com/en-au/guide/mac-help/mh11430/13.0/mac/13.0
All you need do is:
Choose Apple menu > System Settings > General, then click Time Machine. Click Add Backup Disk, select the backup disk, then click Set Up Disk.
That doesn’t work either. It just sets up the new disk. You didn’t explain how to transfer the old backup to the new disk, and neither does the page you linked to. Did you misunderstand the question?
Hello,
thanks for this detailed guide!!!
Apparently this isn´t working anymore on newer MacOS Versions. I have a M1 MBP with Mac OS Monterey and wanted to move my backups from my current 2TB SSD to a 5TB HDD (due to the lack of free disk space) and it is not possible following this guide copying the files. The files are also not organised in a backup.db folder … instead they are organised as snapshots. I also tried to copy the data in disk utility which failed. The thing is, that i really want to keep the old backups.. but i also want to move the data from the SSD and use it for other purposes. Is that really not possible in newer Mac OS Versions?
Thank you!!!
After about 2 days the file successfully transferred but when I went to set up the new drive as a time machine back up, time machine gives me the error that my new drive is not empty and needs to be erased prior to using as a time machine back up. Any idea how to circumvent this?
Dear Dan Helyer,
I cloned the imac internal hard disk to external Samsung T5 SSD drive and used as start up to speed up. It is working well but my MS Office Word, Excel, etc needs activation and license number. So I had to revert back to old hdd to start up..
How can I resolve this issue?
Thanks
Kiran Doshi
Why is it that you type way too much more than enough to describe something supposed to be simple in just a few step ?? This makes us hate your website regardless of what it is. We are not going to visit again by trying to make us stay longer on your page! We just exit and look for something more simple.
I’m sorry but this is horribly rude. I literally needed just about every instruction he provided. The article was perfectly detailed to ensure any issues that may pop up were taken care of. Nothing about the process for me was simple so don’t assume that because your process was simple that everyone has that experience.
Thanks for the well illustrated article Dan,
I’ve been in IT for 45 years, mostly mainframe related. Still I should have known better… but … I followed these instructions (Steps 1 thru 6), without having read the subsequent paragraph. For people like me, some of the info in the “Problems …” paragraph should be put up-front (e.g. like doing this procedure as a Mac administrator). My practice is to always log on with a userid that lacks admin privileges, and just authenticate whenever a task requires admin rights. So the jury is still out as to whether this very time consuming process actually worked correctly.
This transfer was done on my 21.5″ 2017 iMac running High Sierra, and took nearly 42 hours to “prepare files to copy” and another 35 hours to then copy the 5,442,nnn non-encrypted files.
FYI, I was doing this because my 1TB TM drive had only 16GB left. So I copied everything to a 2TB drive, which I plan to use as the TM drive for my new 24″ iMac M1. My old iMac will be wiped and sold, but all of its historical TM backups will hopefully be accessible on my new iMac. That was my theory anyway. Fingers crossed 😉
I don’t know how long Finder would have taken to build the file list from my total of 130 Time Machine backups of 440GB each. This did not seem to me to be a sensible approach.
A number of people reported failure when attempting to clone the partition instead. I was, however, successful using Clonezilla, which is free cloning software from Taiwan and which on previous occasions I experienced as very reliable. Since Clonezilla requires booting from a USB stick or a CD, it will make your computer unavailable for any other task for the duration.
I don’t know (yet!) whether Clonezilla would work on an Intel-Mac, since did it on a PC laptop (my backup drives are USB-external). Initially I only cloned the partition used for Time Machine, but that rendered the clone un-mountable (no idea why), at least under Linux with HFS+ (didn’t try to mount and/or repair it on the Mac). I then cloned the entire disk (the target disk is new) and that worked.
It took just under 3 hours to clone the 1.4TB Time Machine partition from one USB-3 disk to another. This was 100% successful, and Time Machine works fine with the cloned drive.
“One is none, two is one!”
–Clonezilla works on Intel Macs ! –
I have used Clonezille on an Intel MacbookPro with no problems. Just started up from a Clonezille-DVD from an USB-connected DVD-Drive.
Does anyone have experiences with M1 /M2 Macs and Clonezilla?
Brilliant instructions. I’ve been using Macs for years but often instructions don’t start at the beginning, whereas these tell me where to find what I need and even give me an image.
I had a problem with one file but ignored it and hope all is well.
Needed to install 4 tb as 2 tb was full and didn’t want to exclude any files from Backup.
Many thanks.
Thanks for this post! Found it very helpful.
Hi Dan,
I am backuping my TM to Synology NAS and there is a file with extension – *.backupbundle.
When I look into the package contents, there are folders/files but unable to use it directly. There are many 256MB size UNIX file inside the bands folder.
Is there any 3rd party tools that can convert them into the normal file? Thx.
Hi,
I have a 2015 macbook pro and am running High Sierra 10.13.6.
I recently copied my Backups.backupdb folder from my Toshiba HDD (named TOSHIBA BACKUP to a WD HDD, with a view to erase the Toshiba and encrypt it, then transfer my TM backups back to the Toshiba.
1. I formatted the WD to MacOS Extended (Case-sensitive, Journaled). There was no option for Journaled HFS+ there. Named it “HW backup”
2.I successfully copied the Backups.backupdb to the WD “HW backup” then successfully changed the backup drive on Time Machine, then after a subsequent backup, opened TM and tried to see if I could access my past backups from 2018 on the new WD HDD. I could see them all there but didn’t realise until later that I couldn’t access any of the older backups from before the file transfer.
3. I wiped the Toshiba and formatted as MacOS Extended (Case-sensitive, Journaled, Encrypted), named it “Toshiba backup”
4. I copied the Backups.backupdb folder back to the now encrypted “Toshiba backup” drive.
5. I switched TM back to Toshiba backup drive, and the same thing happened, I could see the older backups but not access them.
Looking over this blog, I see that though I followed most of the steps, both drives did not have the same name when I transferred the Backups.backupdb folder, and the format of the WD was not the one specifically mentioned in the blog, though Journaled HFS+ was not an option in my disk utility.
Should i try any of these options?
– Verify that your Time Machine drive’s desktop icon does not show up as a green TM backup icon but rather the standard yellow disk icon [It is green. How do I change it? Is this too late?]
– Check for any case sensitivities on your drive names [What does this actually mean?}
– Rename the new TM backup drive the exact same as the old TM (and change to a new name after transferring your backups, if desired) [Is it too late if I’ve already copied the data from a drive called “TOSHIBA BACKUP” to a drive called “HW backup”?
Thanks a lot!
I read many blogs and reviews that say Finder is not a good method for cloning. I tried several alternatives but finally have to agree that Finder is indeed the best free solution for copying Time Machine disks. I find it annoying that it has a long ‘preparation’ step with no progress indication and does not confirm when copy is complete (it just closes the window), but it does show progress when actually copying.
It is important to format the new Time Machine disk correctly first to MacOS Extended (Journaled) as Finder will not warn you of a wrong format; you will only find out it does not work when you try to activate it in Time Machine.
Here is a summary of all my trials, all on MacOS Catalina on an iMac with 3.2MHz quad core i5 processor (nothing extraordinary). It took around 6 hours to copy 1Tb.
Program Result Notes
Carbon Copy Cloner NOT SUITABLE Refuses to copy Time Machine drive
ChronoSync NOT SUITABLE Looks like a good way of synchronising folders, but will not copy a disk
Disk Unitly (included in MacOS) NOT SUITABLE It did not work. Backup 2 is “not valid for restoring”.
Do Your Clone NOT FREE for cloning Looks simple to use, but requires activiation to clone.
EaseUS Todo NOT SUITABLE Does backups, not cloning
Finder (included in MacOS) Works OK, though not perfect. Annoying ‘preparation’ step after which user interaction required before copying, but does copy reliably and gives progress bar with time estimated to complete. Does not confirm completiojn (progress bar disappears when finished).
Stellar Drive Clone NOT SUITABLE Will not run on a 64-bit machine!
SuperDuper FAILED Started OK but does not give estimated time remaining. Stopped part way for no apparent reason!.
True Image NOT FREE for cloning Cloning only available in the full version
I was running into the same issue and after hours on the phone with Apple, we figured out what the issue is. Apparently you cannot directly transfer TM backups from one HD to another, which in my case means I’m going out to buy a new external HD because even individually they’re too large for my internal HD.
Copying existing backups.backupdb folders to a brand new, properly formatted partition, on a brand new drive. left an additional 50GB of space over the size of the backups.backupdbfolder to be on the safe side.
It spends a dozen or so hours calculating the copy and then declares it has run out of space after only three of the backup sessions have actually copied.
Oddly, those backups.backupdb folders were originally copied without a problem to their current location.
It appears that the copy is expanding every hard link, file or folder, into a full duplicate of the original files.
same as im expiencing
Hi,
anybody has a solution?
Doesn’t work on 10.14.6.
Followed all steps and have the same issues like most of you:
After copying all items the finder window shows: remaining 5 seconds
But it doesn’t stop copying til copy process ends with “not enough space on target drive”.
Example: My source is tm-backup with 1 tb (drive 1 tb)
Target 2 tb empty drive.
After copying 2 tb (!!! – don’t know, what is copied after finishing all objects:) and taking hours, copy process crashes.
(Attempts with CCC, DriveImage also fail)
Thx for inputs…..
I have exactly the same problem under 10.14.6. Dragging Backups.backupd to the destination drive fills it up completely – after many hours –, and then fails.
But restoring the target disk from the TM source disk with disk utility works, and is even faster. Although this seems to be a No-No according to Apple support.
I have a faulty LaCie Mini 2TB. I’m moving my backups [per all the instructions you list above] to a brand new LaCie Mini 2TB.
The backupdb file is about 400 Gigs.
It has been backing up for 14 hours and is at 1.17TB! How did that happen? The original file is 400G and the copying is at 1.17T?
Oh, and it is stuck in perma “About 5 Seconds” left alert….It’s been like that for about 4 hours.
Should I give up?
i gave up. it had only copied over 4 folders out of maybe 50….at it was at 1.2TB…..something is very wrong. i guess i’ll try again tomorrow? maybe?
Hi DeeDee,
Yes try again. But this time, close all open apps then shut down your Mac. Wait a minute or so and power it back up–then try the transfer.
Follow these steps:
Check that the format of your new backup drive is Journaled HFS+ and the Partition Map Type is GPT (GUID Partition Table).
Set permissions on your new backup drive
Temporarily turn Time Machine off
Copy your backup data from your original drive to your new drive
Open a Finder window. In the Finder’s sidebar, click the icon of the original backup drive.
Open another new Finder window. In the Finder’s sidebar, click the icon of the new backup drive.
Drag the folder “Backups.backupdb” from the original backup drive to the top level of the new backup drive.
Enter your administrator name and password, then click OK to start the copying process.
Copying your backup data often takes a lot of time to complete so be patient on this step.
Finally, set Time Machine to use your new external drive
reformatted the disk, it shows the Journaled HFS+ and the Partition Map Type is GPT (GUID Partition Table)….set the permissions…now, when i drag and drop the backup folder to the brand new drive it says “the volume has the wrong case sensitivity for a backup”.
Hi Deedee,
No this is not fun for a Friday night’s activity. We’re so sorry that this isn’t working for you.
What macOS or OS X version are you working with? To find out, go to the Apple menu at the top-left and choose About this Mac.
There is a bug in earlier macOS versions (prior to some macOS 10.13.4 –that’s High Sierra) that causes Time Machine issues–so that could be the problem.
If Time Machine continues to fail, you could also use a third-party application like Carbon Copy Cloner or SuperDuper.
reformatted the disk again but this time with ‘case sensitive journaled’ option….trying again to copy the files over….didn’t do the Sharing and Permissions thing cause that “ignore ownership on this volume” checkbox and text no longer exists. this is fun….i like spending my friday evening doing dicey file transfers. is there any consensus on LaCie drives? maybe that’s my problem? i mean, one is failing and that’s why i have to do this in the first place.
Mojave 10.14.6
it’s still copying this morning….says it’s done 50.31 GB of 409.66….says there is 4 hours left. it’s acting exactly the same way as the last copy. my guess is that this will fail as well.
Oh gosh, what a pain! I am so sorry DeeDee. Let me look into this more for Mojave.
One thought: name the new hard drive exactly the same as the old hard drive–that might help.
yeah, the same thing happened. it copies all the files 409.66 gb and then keeps going….and the total amount of files starts increasing along with the remaining files to copy.
I canceled with both the files and the remaining files were at 500gb. so strange! I’m going to call lacie and see if they will just give me the replacement drive for free.
i’m trying SuperDuper per your suggestion. i’ll report back if/when it is done. 🙂
didn’t work in superduper either….
Hi DeeDee,
Oh my goodness, this is terrible for you! We are so sorry.
We can also try using Disk Utility to copy over your old TM drive to your new TM drive. And I’ll outline those steps below.
However, since you’ve had multiple failures with Finder and now with SuperDuper, you may want to reach out to Apple Support or SuperSuper support and see if they have additional options and/or can walk you step-by-step through their processes.
How to copy TM backups using Disk Utility
Set the permissions on your new TM drive
Choose Get Info on the new drive in Finder
Verify that Ignore ownership on this volume is unchecked
Open Disk Utility from either Applications>Utilities>Disk Utility or by restarting in Recovery Mode (Command+R keys)
Ensure again that your new TM backup drive is macOS Extended Journaled and GUID partitioned
If using Disk Utility from normal start-up (not recovery mode), turn Time Machine off
In Disk Utility select your new TM backup drive
From the Edit menu item, choose Restore…
From the next menu, choose your old Time Machine disk
Wait for Disk Utility to Restore your old TM backup to your new TM backup drive
If you used Disk Utility from Recovery Mode, restart into standard mode
Check your new drives permissions again, making sure ignore ownership on this volume is unchecked
Open Time Machine in System Preferences and select your new drive to backup to
Run a test backup to your new TM drive
Let us know if this works for you or if you contacted Apple Support or SuperDuper support.
Fingers crossed something gets this done for you!
Liz
Have you seen any cases of old backups not showing up at all with the new drive even though I finished all the steps? Does transferring just some portion of the files matter?
Hi Jen,
No, we have not heard that particular issue before.
Make sure you keep your older drive intact before you erase anything. If you haven’t already done this, shut down, wait for a few minutes and then power up your Mac.
See if after that reboot if your new Time Machine backup drive now correctly shows your TM backups.
If it still isn’t showing up, as long as you have your old TM backup drive, erase and reformat the new drive and run through the steps again. Make sure all other apps are closed and that you don’t use your Mac for other things to allow it’s full processing power to do to your TM drives.
I am having similar problems to AD, Jen & deedee.
I have tried twice.
My time machine backup is on a RAID alongside many other files, 2 computers in my DB, going back to 2014.
My Time Machine backup file is 1.62 TB. My raid is failing, so I need to move my backups. I’m attempting to put them on a 4 TB drive (USB 20 – slow).
I’ve followed Apple’s instructions to the T.
The backup takes 24 hours to prepare, 24 hours to copy, then hangs at 5 seconds.
I gave up the first time after a few hours of 5 seconds, but then I decided to try again and wait it out.
Both times, after finished, the files in my backup date from 7/2014 – 02/2015.
However, the 2nd time, when I waited it out, I got an error that copies 4 TB and I’m out of disk space. (from a 1.62 TB original backup file).
But then when I look at the files that copied, 1.62 TB shows as copied (matched original size, but 2/2015 – 2/2020 files missing!). I’ve turned off the target drive, unmounted and remounted, to no avail.
It’s 2020 and there are years worth of backups that I need to copy before my RAID permanently fails.
I would do a disk clone, but my backups are alongside files and not their own partition, and I don’t have an external drive large enough for that!
MAC OS: Mojave 10.14.6
Any suggestions?
This excellent article presents terse Apple Support articles in a clear, expanded format.
Unfortunately, under macOS Catalina, this fails.
I’m running 10.15.2. after 6 hours of file inspection (2.3 million files) phase one ends. This phase has written some info to the destination volume.
The actual file copy starts and quickly fails with a file permissions error from the finder.
I’m assuming that some further external disk permissions error must be processed.
10.5.2, same failure after 3 days… its not working. Get about 20% of the files transferred and then it fails saying I don’t have permission. Opened a case with Apple already.