Apple offers a lot of free services: iMessage, FaceTime, and iCloud to name a few. But sometimes your iPhone needs to send an SMS message to activate these services, and depending on your cellular carrier, that might cost you.
Irritating activation messages can keep reappearing if you don’t risk the cost of an SMS message. Sometimes, even if you agree to send the text, the activation message comes back again anyway, over and over again.
In this article, we’ve outlined all the steps you can take to stop it.
Why Do I Need to Activate iMessage, FaceTime, or iCloud?
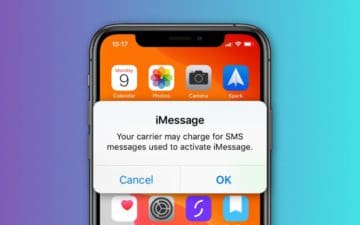
Many of Apple’s communications services need to link to your phone number for them to work. If you want to use one of those services, such as iMessage or FaceTime, you iPhone needs to send an SMS to Apple registering your number.
You might see multiple variations on this message.
This is a standard SMS text charged at your usual rate. Depending on your cell contract, you might pay a set amount for each SMS or you might get a certain number of free messages you can send each month.
If you tap OK in the activation message, your iPhone sends a standard SMS text to Apple and you shouldn’t see the message anymore.
How Do I Stop Receiving Activation Messages?
If you don’t plan to use iMessage, FaceTime, or iCloud it makes sense that you don’t want to risk paying for an SMS to activate them. Sometimes, even if you do send an SMS message, the alerts keep reappearing anyway.
Lots of people struggle with this exact problem. Follow the steps laid out below to fix it, and tell us which step works for you in the comments.
Please note, some of these steps cause another message to appear, but hopefully that’s the last one you get!
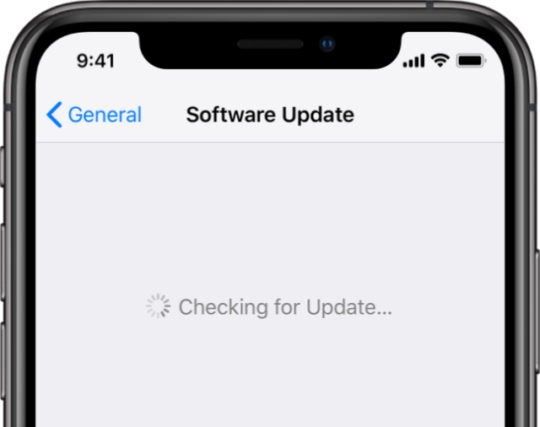
Step 1. Update the Operating Software on Your iPhone
Previous versions of iOS caused problems with iCloud, iMessage, and FaceTime activation messages appearing again and again. Eventually, Apple released a new iOS update to fix this issue.
It’s possible the version of iOS on your iPhone suffers from a similar bug. You should make sure to keep your iPhone up to date so you get any new fixes as soon as Apple releases them.
How to Update iOS on Your iPhone:
Connect your iPhone to a working Internet connection.
Go to Settings > General > Software Update.
Download and install any available updates.
Install the latest software to benefit from bug fixes.
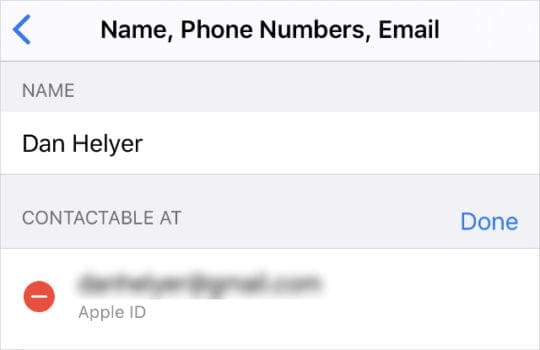
Step 2. Edit the Contact Details Linked to Your Account
If your Apple ID account has the wrong contact details linked to it, Apple might struggle to activate iCloud, iMessage, or FaceTime on your iPhone. Edit your Apple ID details to make sure your phone number and email addresses are correct.
You may need to temporarily turn on iMessage or FaceTime to edit the contact details linked to those services, even if you don’t plan to use them afterward.
How to Edit Your Apple ID Contact Details:
Go to Settings > [Your Name] > Name, Phone Numbers, Email.
Tap Edit next to the Contactable At heading.
Add your email or phone number if you haven’t done so already and correct any incorrect details.
Remove incorrect details and add the correct ones.
How to Edit Your iMessage and FaceTime Contact Details:
To edit your FaceTime contact details:
Go to Settings > FaceTime.
Turn on FaceTime.
Tap the correct phone number or email addresses to turn them on.
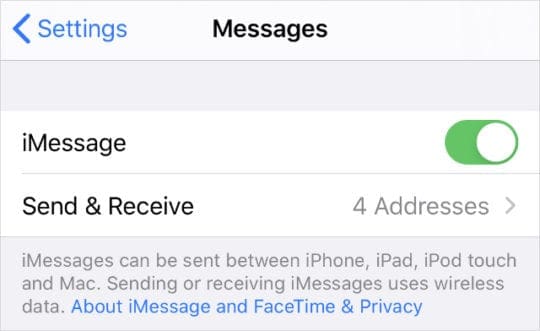
To edit your iMessage contact details:
Go to Settings > Messages.
Turn on iMessage.
Tap Send & Receive.
Tap the correct phone number or email addresses to turn them on.
Select Send & Recieve to review your details.
Step 3. Disable iMessage, FaceTime, or iCloud
Whether or not you plan to use iMessage, FaceTime, or iCloud, you should disable the service to try and stop the repeated activation messages. You may need to turn each service on temporarily before you fully disable it.
If you still want to use iMessage, FaceTime, or iCloud you can enable the service again after restarting your device. But the act of temporarily disabling it may fix the constant activation messages.
Disabling and reactivating these services causes at least one more activation message to appear, which you need to tap OK for, even if it may charge you.
How to Disable iMessage:
Go to Settings > Messages.
Turn iMessage on.
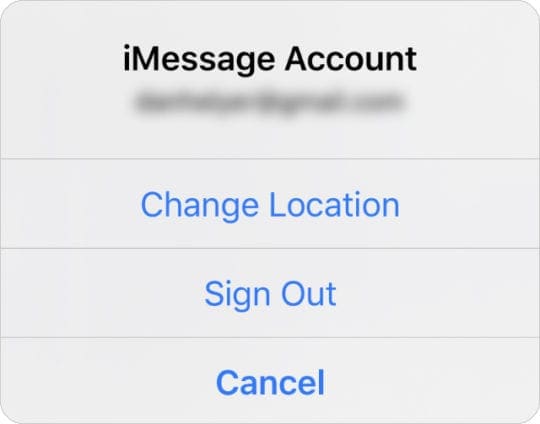
Tap Send & Receive, then tap your Apple ID account.
Choose to Sign Out of your iMessage account.
Go back and turn iMessage off.
Press and hold the Side button to power off your iPhone.
Sign out of iMessage to disable the activation messages.
How to Disable FaceTime:
Go to Settings > FaceTime.
Turn FaceTime on.
Tap your Apple ID account and choose to Sign Out of FaceTime.
Turn FaceTime off.
Press and hold the Side button to power off your iPhone.
How to Disable iCloud:
Go to Settings > [Your Name] > Sign Out.
If prompted, enter your Apple ID password to Turn Off Find My iPhone.
Choose the data to keep on your iPhone and tap Sign Out.
Press and hold the Side button to power off your iPhone.
Find the Sign Out button beneath your Apple devices.
Step 4. Remove and Reinsert the SIM Card on Your iPhone
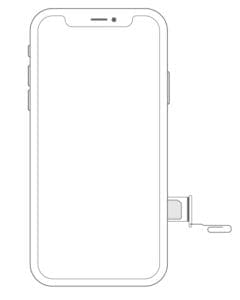
You can eject the SIM tray with a paperclip.
It’s possible you keep seeing the same activation messages because your iPhone fails to send the SMS successfully. A potential solution for this is to remove and reinsert the SIM card in your iPhone.
Use a SIM removal tool or a straightened paperclip to eject the SIM tray on the side of your iPhone. Inspect the SIM card for signs of liquid, dirt, or other damage, then return it to the tray and put it back in your iPhone.
Step 5. Make Sure the Date and Time Is Correct
Date and time inconsistencies cause all manner of problems with Apple’s various services. It’s important to check the date and time on your iPhone are accurate to the region you’re in, which you can do from the General settings.
How to Edit the Date and Time on Your iPhone:
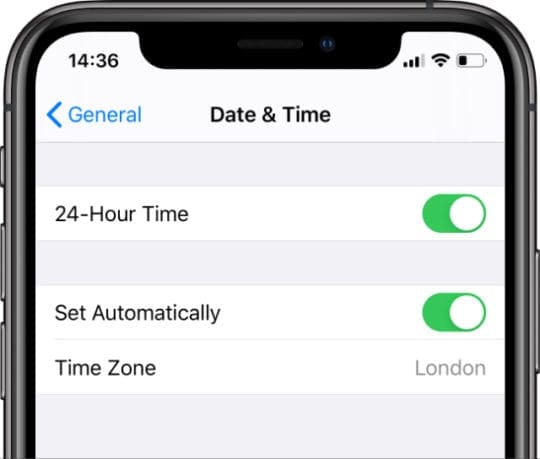
Go to Settings > General > Date & Time.
Turn on Set Automatically and check the Time Zone is correct.
Turn on Set Automatically to set your date and time.
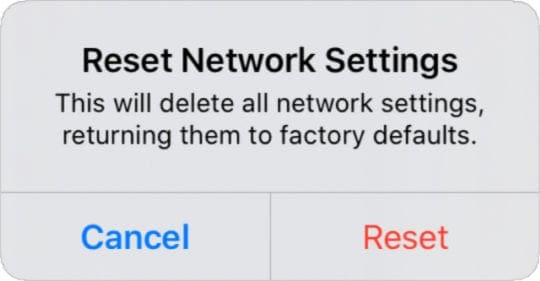
Step 6. Reset the Network Settings on Your iPhone
You can fix a range of different iPhone problems by resetting the network settings on your device. When you do this, it shouldn’t delete any content from your iPhone, but it does erase any Wi-Fi passwords you saved.
Don’t reset your network settings unless you can reconnect to Wi-Fi.
Step 7. Erase and Restore Your iPhone
If nothing else stopped the activation messages for iCloud, iMessage, or FaceTime, you might need to erase your iPhone entirely.
This is a good troubleshooting solution for most software-based problems since it eliminates the chance of corrupt files in your software.
The instructions below erase all the content from your iPhone: photos, messages, apps, and everything else. Make sure you back up your iPhone before following them.
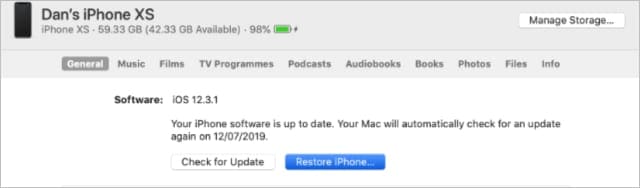
In macOS Catalina or later: Open Finder and select your iPhone from the sidebar. Then go to the General tab.
In Windows, macOS Mojave, or earlier: Open iTunes and select the iPhone icon from the top-left. Then go to the Summary page.
Choose the option to Restore iPhone.
If prompted, use your Apple ID password to disable Find My iPhone.
After restoring your iPhone, follow the on-screen setup to recover data from your backup.
Connect your iPhone to a computer to restore it.
Learn the Difference Between iMessage and Text Messages
Sometimes it seems like a lot of hassle to simply activate iMessage on your iPhone, thanks to all the SMS activation alerts you keep receiving. You might question the difference between iMessage and regular texts anyway.
But as frustrating as it seems to activate it, there are a lot of good reasons to use iMessage instead of SMS texts. You can send more media, faster, and for free! You just need to activate the service first.
Dan writes tutorials and troubleshooting guides to help people make the most of their technology. Before becoming a writer, he earned a BSc in Sound Technology, supervised repairs at an Apple Store, and even taught English in China.


Write a Comment