There’s a frustrating issue with macOS, where the app you’re using stops working and spits out an error message saying it isn’t open anymore. This mostly happens with Preview, but it can affect any app on your Mac, including Finder, Safari, the App Store, and others.
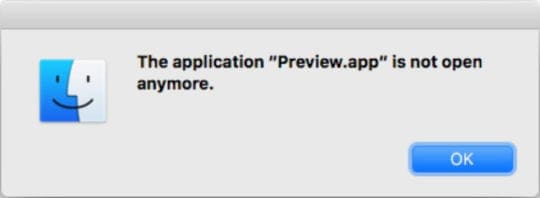
When this error occurs, the app you’re using becomes unresponsive and the following alert pops up:
Despite the error message, your app still appears as though it’s open. There may be a dot beneath it in the Dock or it may still have open windows. But you’re unable to use it. With Preview, that means you can’t open PDFs, screenshots, or other images anymore!
This article explains how to fix this error and get your apps working again. We’ve even gone so far as explaining how to fully reinstall macOS, in case this issue keeps cropping up again and again.
The first thing to try and do — although it doesn’t always work for this error — is to close the unresponsive app. Despite the error message telling you Preview “is not open anymore,” it usually is. But it has frozen and needs to be reopened.
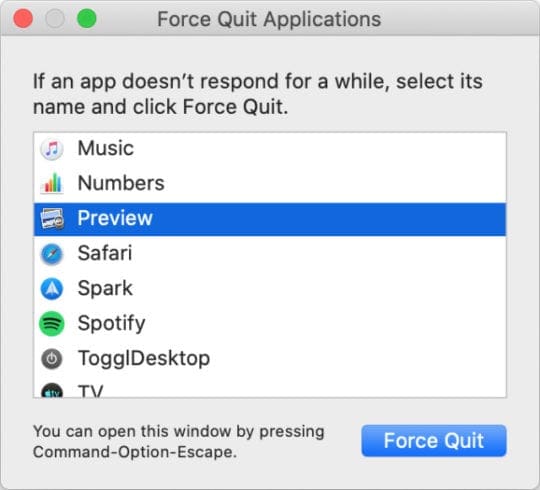
There are two ways to Force Quit an app in macOS: using the Force Quit window or using Activity Monitor. If either of these methods works, make sure you reboot your Mac before opening Preview again.
How do I close Preview using the Force Quit window?
Press the command+option+escape keys to open the Force Quit window.
Activity Monitor displays all the processes running on your computer at any point in time.
Step 2. Reboot your Mac
If it’s not possible to close Preview using Force Quit or Activity Monitor, you can close it by rebooting your Mac instead. This forces any apps that macOS says are not open to restart, bypassing the error message.
The safest way to reboot your Mac is using a soft reboot, but that may not be possible if the unresponsive app cannot close. If that’s the case, you have no choice but to use a hard reboot. We’ve explained both reboots below.
How do I soft reboot my Mac?
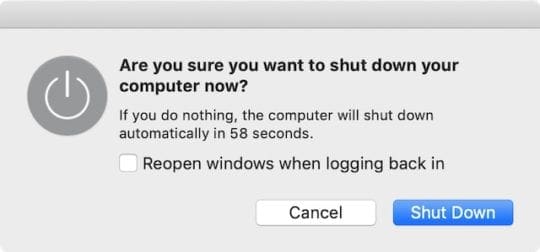
From the menu bar, go to > Shut Down.
Uncheck the box to reopen windows when logging back in.
Confirm you want to Shut Down.
Wait at least 30 seconds for your Mac to power off.
Briefly press the power button to turn your Mac on again.
Leave the box unchecked so Preview doesn’t immediately reopen after rebooting.
Press and hold the power button for 10 seconds or so until the screen goes black.
Wait 30 seconds, then briefly press the power button again to restart your Mac
In the alert window that appears, click Cancel to avoid reopening any apps.
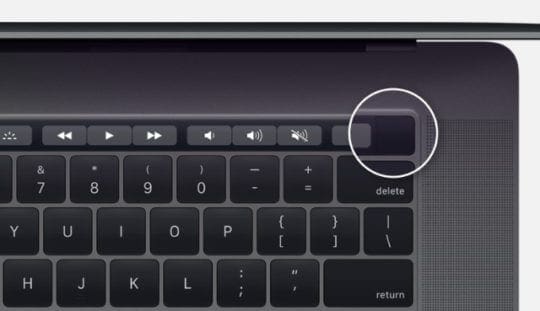
On newer MacBooks, hold the Touch ID button to restart your Mac. Image from Apple.
Step 3. Remove your Preview preferences
If you still get the same error message — ‘The application “Preview.app” is not open anymore’ — you may need to remove some of your preference files.
Make a backup of your Mac first using Time Machine.
These are small files that macOS automatically creates to store your settings for each application. You can usually remove them without losing any data or causing problems, but we recommend you back up your Mac first just in case.
Follow each of the suggestions below, testing Preview again after each one.
We advise you to move the preference files to a new folder on your Desktop for safekeeping, that way you can always put them back if something goes wrong. If this works and your issue is fixed, go ahead and delete those preference files.
How do I remove my Preview preferences?
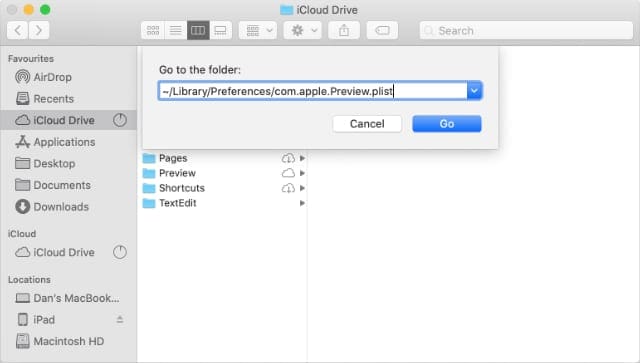
Open Finder, then from the menu bar select Go > Go to Folder.
Type the following location and click Go: ~/Library/Preferences/com.apple.Preview.plist
Move the highlighted preferences file to your Desktop for safekeeping.
Reboot your Mac and test Preview again.
If the error persists, repeat the steps above for each of the following files:
If Finder doesn’t find a preferences file, it means you don’t have it.
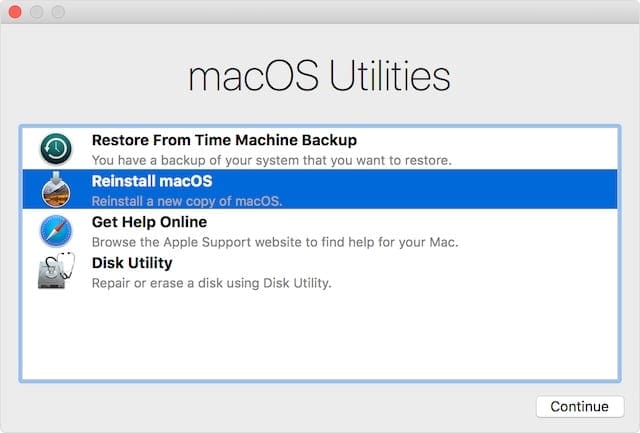
Step 4. Update or reinstall macOS
Hopefully, that’s all you need to resolve the ‘“Preview.app” is not open anymore’ errors. But if you’re still experiencing problems, there might be a bug in your operating software. You can fix this by updating or reinstalling macOS.
If you’re already running the latest version of macOS or if an update doesn’t solve anything, you need to reinstall macOS using Recovery Mode. This shouldn’t affect your data — although we recommend you back up your Mac first anyway.
Reinstalling macOS rewrites every line of code in the operating software on your Mac.
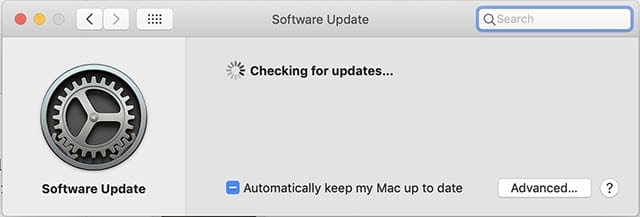
How do I update to the latest release of macOS?
Connect your Mac to a working Internet connection.
Go to System Preferences > Software Update to check for new updates.
Download and install any updates your Mac finds.
Tick the box at the bottom of the update window to keep your Mac up to date.
Dan writes tutorials and troubleshooting guides to help people make the most of their technology. Before becoming a writer, he earned a BSc in Sound Technology, supervised repairs at an Apple Store, and even taught English in China.
This was soo helpful thank you so much. I’ve tried every single method there was in order to trh fixing my problem but none of them worked until i checked out ur website which was the only one i came accross that mentioned the “reboot method” and specifically the hard reboot method which is the one that worked for me.. thank you


This was soo helpful thank you so much. I’ve tried every single method there was in order to trh fixing my problem but none of them worked until i checked out ur website which was the only one i came accross that mentioned the “reboot method” and specifically the hard reboot method which is the one that worked for me.. thank you