• Skip to primary navigation
  • Skip to main content
  • Skip to primary sidebar
  • Skip to footer

AppleToolBox

Tools and Fixes for Mac, iPad, iPhone & iWatch

Search posts

  • About
  • Contact

CONNECT WITH US

CATEGORIES

  • iPhone
  • iPad
  • iPod
  • Apple Watch
  • Mac/MacBook
  • AirPods
  • Apple TV
  • News
  • Apple Services
  • HomePod
  • Reviews

SITE

  • Home
  • About Us
  • Contact
  • Advertise

Search posts

You are here: Home / iPhone / How to Change the Expiration Time for Audio Messages in iMessage

How to Change the Expiration Time for Audio Messages in iMessage

By Danny Maiorca 0 comments Last updated March 13, 2023

iMessage has evolved beyond simple text messages. These days, you can easily send audio and much more to others. When you send voice recordings in iMessage, these will typically have an expiration time. Luckily, you can easily change this from your smartphone.

Related Reading:

  • What Is iMessage and How Is It Different From Normal Text Messages?
  • How to Use iMessage Group Chat on iPhone or iPad
  • macOS: Enable and Disable iMessage
  • Does iMessage Use My Data Plan?
  • iMessage Needs to be Enabled to Send This Message: What Does It Mean?

If you want to change the expiration time for audio messages in iMessage, we’ll tell you the most important things to know in this article. You’ll learn about your different options, along with how to actually make these adjustments.

What Expiration Times Can You Choose for Your Audio Messages in iMessage?

When choosing how long you want to wait before audio messages expire in iMessage, you don’t have a huge range of options. Instead, you can decide whether you want them to automatically delete from your chats within two minutes – or if you’d like them to stay forever.

In many cases, you might want to select Never. Doing so will ensure that people have the chance to get the information they need at a time that suits them.

How to Change Your Audio Message Expiration Times in iMessage

Messages Settings iPhone Screenshot
Choose Audio Messages iPhone Screenshot

Now that you know how long you can change your audio expiration times in iMessage to, let’s look at how to complete the process. Below are the steps you need to take.

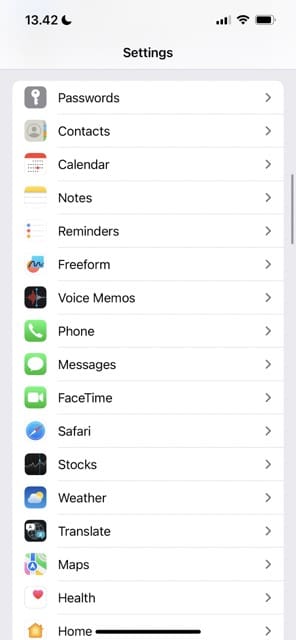
  1. Open the Settings app on your iPhone.
  2. Scroll down to Messages and click on this tab.
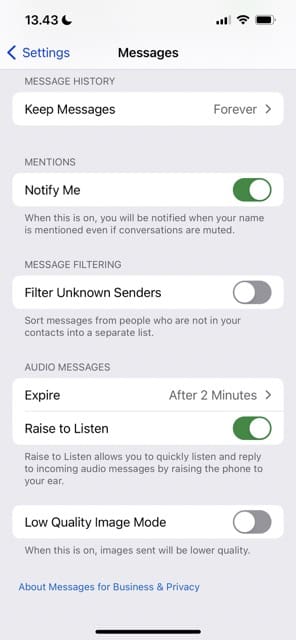
  3. In the next window, you’ll need to scroll down again. Toward the bottom of the page, you’ll see a section called Audio Messages. Click on the Expire tab.

Choose how long you’d like your audio correspondences to last. After making your preferred change, you can close the Settings app.

Now You Know How to Change Audio Message Expiration Times in iMessage

Knowing how to change your audio message expiration times can make it much easier to communicate with others. Sending voice messages is a great way to quickly share information that might take a while to type, such as telling someone where you are.

You can choose whether you want to make audio messages last forever, or whether you’d prefer for them to expire within a couple of minutes. Regardless of your choice, you can follow the steps in this article to reach your desired result.

Danny Maiorca

Danny is a freelance writer who has been using Apple products for over a decade. He’s written for some of the largest technology publications on the web and previously worked as an in-house writer before carving his own route. Danny grew up in the UK, but now writes about tech from his Scandinavian base.

Related Posts:

  • How to Use iMessage Group Chat on iPhone or iPad
    How to Use iMessage Group Chat on iPhone or iPad
  • iOS 12 Voice Memos Overhauled with New Features — Here's How to Use Them
    iOS 12 Voice Memos Overhauled with New Features — Here's How…
  • iMessage not working iOS 13 or iPadOS? Fix it today
    iMessage not working iOS 13 or iPadOS? Fix it today
  • iOS 13 or iPadOS problems and how to fix them - Troubleshooting Guide
    iOS 13 or iPadOS problems and how to fix them -…
  • Why Is My FaceTime Not Working in iOS 12 or iOS 13 and iPadOS? How-To Fix It
    Why Is My FaceTime Not Working in iOS 12 or iOS 13 and…
  • How To Remove Yourself From A Group iMessage
    How To Remove Yourself From A Group iMessage
  • iMessage Not Working iOS 12? Fix Message App Problems
    iMessage Not Working iOS 12? Fix Message App Problems
  • How To Use Dual SIM and eSIM on iPhone 11, XR, SE, & XS
    How To Use Dual SIM and eSIM on iPhone 11, XR, SE, & XS
  • The Best iPhone And Mac Shortcuts For Beginners
    The Best iPhone And Mac Shortcuts For Beginners

Reader Interactions

Write a Comment Cancel reply

Primary Sidebar

Recent Posts

  • iOS 17: What To Expect From Apple’s Next Major Software Release
  • How to Fix Attachments Not Showing in Outlook for Mac
  • 6 Mac Apps for Creating To-Do Lists
  • Safari Experimental Features: All You Need to Know
  • How to View Web Page Source on iPhone/iPad: 7 Best Methods
  • How to Change the Color Profile on Your Mac

Connect with us

Footer

ABOUT

  • About Us
  • Contact us
  • Advertise
  • Privacy
  • Terms of Use

GUIDES

  • iOS 13 & iPadOS
  • Apple ID
  • iCloud
  • App Store
  • iTunes
  • FaceTime
  • iMessage
  • Siri
  • Books and iBooks
  • Game Center
  • AirPlay

CONNECT

  • Facebook
  • Twitter
  • FeedBurner
  • YouTube

© Copyright 2010-2023 Guiding Tech Media · All Rights Reserved

This site and its content are in no way affiliated or endorsed by Apple, Inc. · Reproduction without explicit permission is prohibited