Need to limit what your child (or other) can access on your iPad, iPhone, or another iDevice? Worried that your little one will wreak havoc on your phone, prowl through your personal data, change settings or passcode, or cause other problems?
Try using Guided Access and limit your child to a single app. And even control which features are available within that app!
iPads are a modern essential for parents, so having the ability to lock apps into Kids Mode is critical. We don’t want our toddlers opening up or deleting a whole bunch of apps from our iPads and iPhones.
We do want our children to enjoy a great child-friendly iPad experience, but always within the boundaries, we set as appropriate. And the best way to do this is to lock apps into a Kids Mode.
Everyone in our family loves our iPads. It’s so handy to just hand over to the kids for reading books, playing interactive games, drawing, or watching a show on Netflix and other streaming services. But it’s also too darn easy for kids to get into apps they shouldn’t, aren’t supposed to, or even purchasing content and deleting apps.
And then there’s that ever-alluring Home button–my youngest at 18 months just cannot keep his hands off it! Instead of quietly watching or playing with an app, he’ll watch what feels like 5 seconds and then go back to clicking the Home button AGAIN and AGAIN.
Kids are naturally curious AND have limited attention spans, so it’s only a matter of time before that curiosity gets the best of them. And they start exploring. So, as parents, we really need some parental controls in place. We need to have the ability to lock apps into Kids Mode. We need the controls to lock apps!
Parents Want a Watchful Eye
Parents frequently ask us here at Apple ToolBox how they restrict access to a single app, so they quickly lock their iDevice to a specific app before handing it over to the kids. This setting is similar to the Kid Mode featured on Android Tablets and other devices.
Kids Mode lets our kids draw, learn, listen, watch, and be creative without being able to access or mess with our personal stuff. When the kids finish, we simply disable Kids Mode and go back to using our iDevices like normal.
The good news is that turning on a single app restriction on an iPad, iPhone, or other iDevice is reasonably simple.
So let’s get to it!
How to Lock apps to a Single app
To control how our kids use iDevices, we utilize the Guided Access features. Essentially this locks the iDevice to just one app for the user. Guided Access is best when you temporarily hand your iPad or iPhone to your kids.
Guided Access Versus Parental Controls
If interested in setting up an iPad, iPhone, or another iDevice for full-time kid use, a better strategy is to set-up Restrictions on the iDevice.
Restrictions are ideal for locking down an iDevice that your kids use all the time. To learn how to set up parental control Restrictions, please check out this post if using iOS 11 and earlier
To help distinguish these settings, think of Guided Access as temporaryand Restrictions as always.
All About Guided Access
Guided Access helps you, your child, or anyone stay focused on a SINGLE task/app when using your iPhone, iPad or iPod touch. Guided Access limits your device to a single app and lets you control which app features are active and available.
Whether it’s a writing app, a story or book app, drawing app, music app, or a video app, guided access helps to keep users’ attention on that single app.
Guided Access isn’t just for kids
This feature is helpful in a variety of settings, from working with clients on a single app, to training and education, to working with people on the autistic spectrum, with Alzheimer’s, dementia, or attention deficit disorder.
Guided access is also used in public setting kiosks where you don’t want users to be able to open other apps.
With Guided Access, creating a “guest mode” is also possible. So if you hand your iDevice to a stranger or someone you don’t know very well to use, watch a video, read something, or look at something via a single app, you won’t worry that they have access to any of your private information.
Use Guided Access to:
Temporarily restrict your iOS device to a single app
Disable areas of the screen that aren’t relevant to a task, or areas where an accidental gesture might cause a distraction
Disable certain hardware buttons like volume and keyboard
Setting-Up Guided Access to Lock apps
Guided Access allows you to lock your device to a single app. For example, you lock your iDevice with Guided Access to play music or only run a specific educational app or game.
And only then do you hand it to your kids. Your kids will only be able to use that specific app. Once the kids are finished, you unlock your iDevice with a PIN, and you are back to using it normally.
To set up Guided Access:
Open Settings
Navigate to General > Accessibility
Scroll Down to Guided Access under the heading Learning
Enable Guided Access and set a passcode or utilize Touch ID/Face ID
Choose a passcode you’ll remember, you need it to turn Guided Access OFF
To start Guided Access:
Launch the app you want to lock
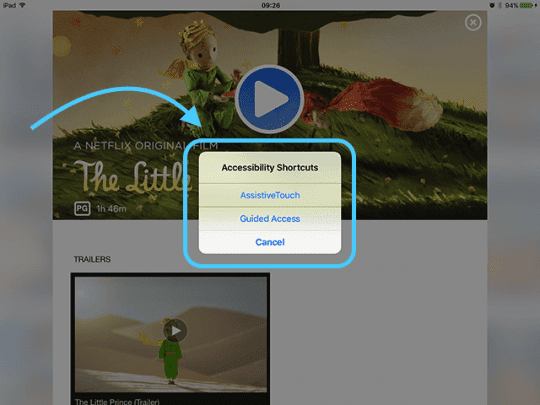
Triple-click Home (or the side switch for devices with no home)
If you have Accessibility Shortcuts enabled, you see a menu of options
Select Guided Access
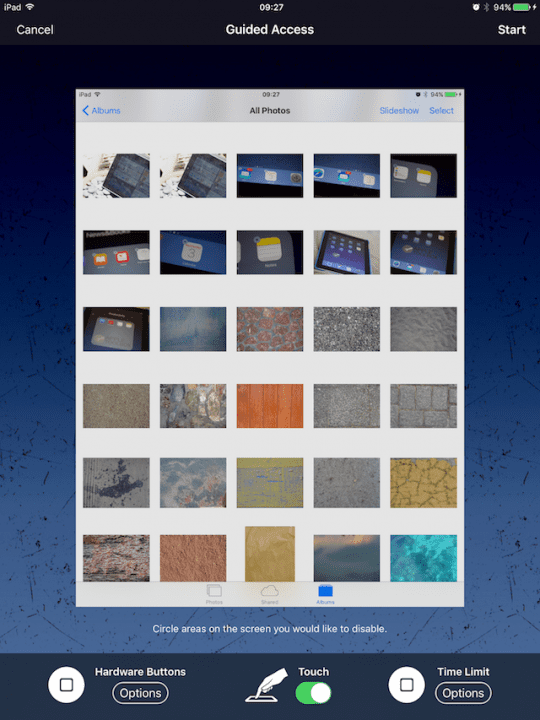
Set your Guided Access rules
Choose what to disable
Hardware Buttons
Sleep/Wake
Volume
Motion
Keyboard
Touch
To ignore all screen touches, turn OFF
Turn ON and swipe the areas you wanted to disable
If your app displays ads, you probably want to disable these areas of the screen
Set Time Limit if desired
Tap the Start button
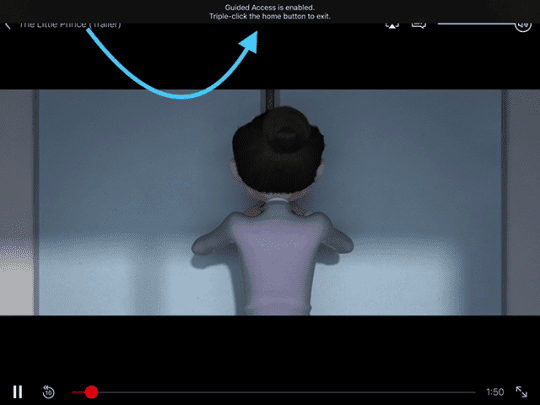
Your iPad, iPhone, or iPod touch is now locked into the current application. Pressing Home or swiping up the home gesture bar no longer leaves the designated app.
You’ll see a message at the top of your screen letting you know Guided Access is enabled and to triple-click Home or the Side button to exit (you’ll need that passcode.)
And please note that because just about everything is disabled when Guided Access is on, even Force Quit won’t work.
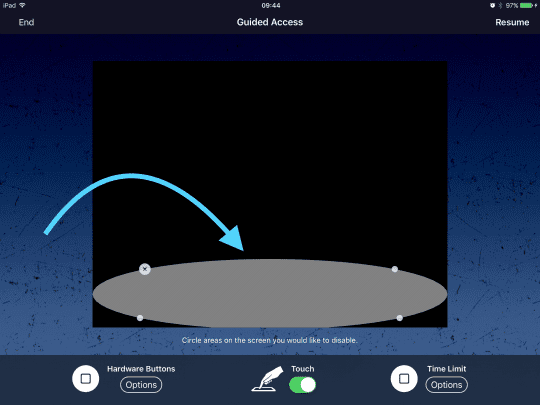
Disable On-Screen Areas
Just in case you missed it, in Guided Access, there is an option to disablecertain parts of the screen by merely circling them.
Say, for example, your kids watch a movie, and you want to disable the playback controls on the video screen–you can do that! Or there are on-screen ads; you can disable those parts too.
Just use your finger and draw around the area(s) you wish disabled. This feature is my favorite part of Guided Access. It gives unexpected control.
Use Guided Access to turn off app controls, parts of the screen, and motion sensing. Follow these steps:
To disable app controls and certain areas of the app screen:
Circle any part of the screen you want to disable
Use the handles to adjust the area
To ignore all screen touches, turn Touch entirely OFF.
Orient Your Screen
It’s a good idea to lock screen orientation before handing your iDevice to your child. Changing the orientation of the device is enough to place buttons in an unprotected area of the screen, allowing your child to escape a lot of these Guided Access Restrictions.
So remember to lock it until Apple fixes this, it is easy for your children to snap out of the reserved screen or feature(s), even entirely by accident.
So best to ensure screen rotation is set to lock, for either landscape or portrait depending on the app you’re opening for them.
To Lock Screen Orientation
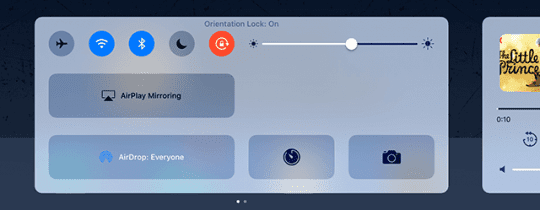
First, check if screen orientation is already ON. If you see the orientation icon in the top screen status bar, Orientation Lock is on.
To turn screen orientation on, swipe to open the Control Center.
Look for the screen orientation icon
If this icon is white, screen orientation is on
If the icon is gray, screen orientation is off
To turn on, just tap the screen orientation icon once
The icon turns white
The icon appears in top screen status bar
Reboot is Always Possible
Even in Guided Access Mode, you can reboot your iPad/iPhone by holding Home and Power buttons for 15 seconds or using other methods to force restart (depending on the model.) Chances are your children won’t perform this action.
But it is possible and probably must stay in place for a variety of reasons.
How Do You Turn Off Guided Access?
To get out of Guided Access, simply press the Home or Side button three times (triple click) and enter your Face ID, Touch ID, or that same passcode chosen during your setup of Guided Access to unlock your iDevice. Your iDevice is now back to its normal.
If you’d want to turn off Guided Access completely, just go back to Settings > Accessibility > Guided Access > and slide the Guided Access setting to OFF. You need to enter your Face ID, Touch ID or the passcode again. That’s it!
Troubleshooting Guided Access
If triple-clicking the Home or Side button didn’t do anything, and you’re stuck in a Guided Access app, here are some suggestion from our Apple ToolBox readers:
Tips to get Guided Access Unstuck
Force Restart
On an iPhone X Series phone, iPhone 8, or iPhone 8 Plus: Press and quickly release the Volume Up button. Press and immediately release the Volume Down button. Then, press and hold the Side button until you see the Apple logo
On an iPhone 7 or iPhone 7 Plus: Press and hold both the Side and Volume Down buttons for at least 10 seconds, until you see the Apple logo
On an iPhone 6s and earlier, iPad, or iPod touch: Press and hold both the Home and the Top (or Side) buttons for at least 10 seconds, until you see the Apple logo
Once the iDevice reboots, go back to Settings > Accessibility > Guided Access and turn OFF
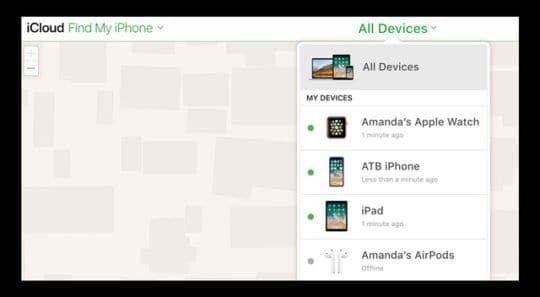
Sign into icloud.com on a computer (this method only works if you turned on Find My iPhone (iPad or iPod Touch) and turned on iCloud
Allow Access from a different device and enter the Verification Code if Two Factor Authentication is on
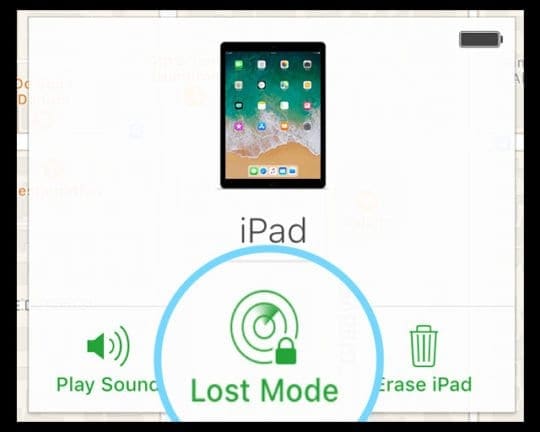
Go to Find iPhone
Select the device that’s stuck in Guided Access from “All Devices.”
Turn on Lost Mode
Press Next on the prompts for adding your phone number and a message to force your iPhone to go iPhone lock screen
Type in your device password and Guided Access should be disabled (you should see your Home Screen)
Some readers report that fully draining their batteries to force a shutdown and then recharging worked for them
Occasionally, third-party apps like Skype get stuck when using Guided Access. If a reboot didn’t work, try the following steps to resolve (for iTunes 12.6 version and lower)
Plug your iPad, iPhone, or another iDevice into your computer. (Leave your iPad powered on)
Open iTunes and select your iDevice
Delete the app that you were stuck in (like our example Skype)
Sync
Once you delete the troublesome app, you should be able to triple-click the home or side button, and got the expected Touch ID/Face ID or password screen for disengaging Guided Access.
Once confirmed that Guided Access is no longer stuck on the third-party app, reinstall the app you deleted above from the app store.
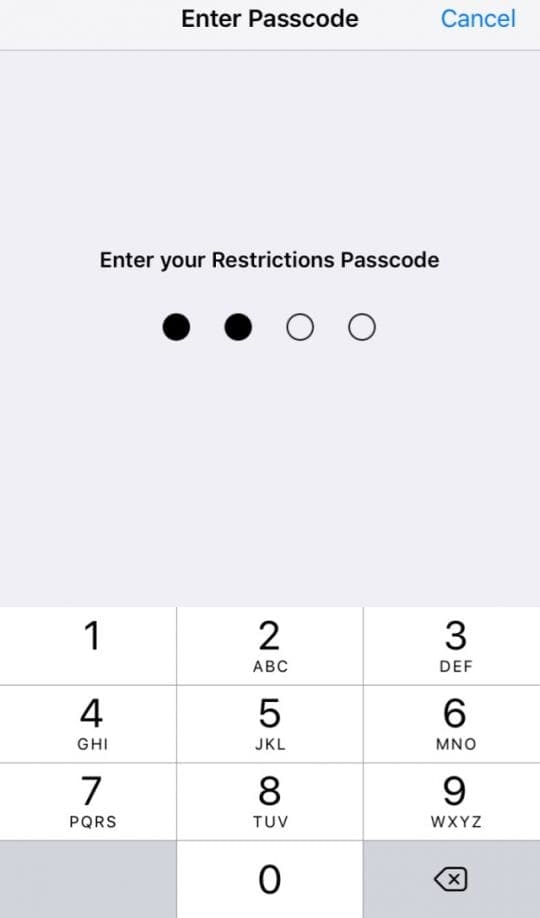
Forget Your Screen Time or Restrictions Password?
Forgetting your Screen Time or Restrictions passcode is pretty easy to do, especially if you don’t use this feature often. Several of our readers found success using a program called pinfinder.
Gareth Watts created pinfinder after a PIN was forgotten for a kid’s iPod Touch and wiping meant a heck of a lot more work than writing this little program. It sounds like a lot of us have similar situations! And that’s why many of our readers find pinfinder useful!
Pinfinder recovers your restrictions passcode, that’s the password that limits what kids and others people can do with your iPhone and other iDevices. You know, crazy things like making in-app purchases or sending Facebook updates to your account.
Using pinfinder is easy
Just choose the file fitting your operative system, unzip the file, and run the program. And of course, make sure you follow all the instructions on pinfinder. Our users report that they then received their restrictions passcode and were able to use their iDevices normally.
Pinfinder recovers Screen Time or Restrictions passcodes from encrypted iTunes backups. Just make sure you know the password used to encrypt the backup with iTunes!
If your issue is that you are completely locked out of your phone, and you do not remember your lock screen passcode, then, unfortunately, pinfinder can’t help. If this is your situation, check out our article on iPhone Passcode Required.
How-To Use Pinfinder to Recover Your Screen Time or Restrictions/Guided Access Passcode
Use iTunes to create an encrypted backup of your device
Write down or save the password you use to encrypt your backup
Download pinfinder for Mac and then run it by right-clicking on the pinfinder icon and selecting Open
Using Mac OS X Mojave or Above?
Make sure you allow terminal programs to access the backup data created by iTunes.
First, open System Preferences > Security & Privacy and select the Privacy tab. Then, add the Terminal program located in the Application->Utility folder to the list of allowed applications.
Don’t Forget To Check Out Our Video On Parenting With Apple Devices
Wrap Up
All parents try to keep an eye on what our kids are watching and doing with their technology. But we know we are not always present and able to keep eyes on the prize all the time, so it’s nice to have a backup in Guided Access.
Guided Access is enabled and disabled with your Face ID, Touch ID or passcode, so you don’t activate it unless you need to. Once you turn this feature on in Settings, a simple triple click will activate it on any app you or your kids want.
Guided Access is fabulous for parents in that it gives us a measure of control. It keeps our kids from “accidentally” buying new apps, clicking on advertisements, and getting out of their book, show, or game. And best of all for parents like me, it prevents that endless clicking of the home button!
For most of her professional life, Amanda Elizabeth (Liz for short) trained all sorts of folks on how to use media as a tool to tell their own unique stories. She knows a thing or two about teaching others and creating how-to guides!
Her clients include Edutopia, Scribe Video Center, Third Path Institute, Bracket, The Philadelphia Museum of Art, and the Big Picture Alliance.
Elizabeth received her Master of Fine Arts degree in media making from Temple University, where she also taught undergrads as an adjunct faculty member in their department of Film and Media Arts.
Hello, I am trying to figuring out how to fix my screen time passcode which I forgot….it seems nothing is working and I haven’t tried erasing all strictly because in order to do so I need need to know my Screen time passcode!
I am rather frustrated at this matter, it’s been weeks on not even having an App Store on my phone…
PinFinder did what it was meant to do – read encrypted backup. Unfortunately, my result said “Restrictions Passcode” and “none”….smh. I was not surprised since I don’t have restrictions set and I’ve never set up a passcode for that….Apple needs to have a work around for this – if nothing else a way to get to it form your settings in iTunes or something. This is asinine..
It’s not working. I’ve got iOS12 installed. I’ve followed the pinfinder instructions very carefully. I’ve even looked at the instructions for how to install and use it on other websites. It all seems very straight forward, but when it’s all said and done it’s not working for me.
After having done the encrypted backup I launch Terminal but nothing happens.
A new window opens up telling me when I last logged on to Terminal, and what device I’m on. That’s it!
I’ve waited and waited but nothing changes/happens.
I tried typing in the code for my encrypted backup, but that only resulted in a “command not found” message.
What’s going wrong here, and what can I do to fix it?
Please see the instructions for using pinfinder with iOS 12 here.
If you use macOS Mojave, make sure you allow the Terminal Utility access first by going to Apple Menu > System Preferences > Security & Privacy > Privacy > Full Disk Access and adding Terminal to the list of programs allowed. If you see the lock icon in the bottom-left corner closed, you need to click on that first and enter your admin passcode to allow you to make these changes.
If pinfinder still isn’t working for you, please reach out to pinfinder directly via the Questions section and look for the sub-heading It Didn’t Work For Me.
Tried pinfinder, but it said there was no Restrictions password, even though my iPad said Restrictions were on. Presumably I set it up when the iPad was new, many years ago, (on iOS 4) but I can’t remember doing it. Luckily I have managed to guess a number that was the correct one, on attempt 5, so I have been able to get rid of another new feature provided by Apple that has no relevance to me.


Hello, I am trying to figuring out how to fix my screen time passcode which I forgot….it seems nothing is working and I haven’t tried erasing all strictly because in order to do so I need need to know my Screen time passcode!
I am rather frustrated at this matter, it’s been weeks on not even having an App Store on my phone…
I really need help for I want it gone!
Hi Jilly,
Take a look at this article that addresses issues with Screen Time passcodes: How-To Reset the Screen Time Passcode on iOS, iPadOS, or macOS
Fantastic article which is really helpful, thank you very much for writing it.
I don’t no my restriction password
Hi Emery,
Check out this article on how to recover a forgotten Screen Time or Restrictions passcode.
Turn off restrictions by going to:
1) for iOS 12 +, Settings > Screen Time > Turn Screen Time off
2) for iOS 11 and below, Settings > General > Restrictions
Awesome! Took all of 30 seconds to install and run! Worked perfectly.
PinFinder did what it was meant to do – read encrypted backup. Unfortunately, my result said “Restrictions Passcode” and “none”….smh. I was not surprised since I don’t have restrictions set and I’ve never set up a passcode for that….Apple needs to have a work around for this – if nothing else a way to get to it form your settings in iTunes or something. This is asinine..
It’s not working. I’ve got iOS12 installed. I’ve followed the pinfinder instructions very carefully. I’ve even looked at the instructions for how to install and use it on other websites. It all seems very straight forward, but when it’s all said and done it’s not working for me.
After having done the encrypted backup I launch Terminal but nothing happens.
A new window opens up telling me when I last logged on to Terminal, and what device I’m on. That’s it!
I’ve waited and waited but nothing changes/happens.
I tried typing in the code for my encrypted backup, but that only resulted in a “command not found” message.
What’s going wrong here, and what can I do to fix it?
Hi Erichha,
Please see the instructions for using pinfinder with iOS 12 here.
If you use macOS Mojave, make sure you allow the Terminal Utility access first by going to Apple Menu > System Preferences > Security & Privacy > Privacy > Full Disk Access and adding Terminal to the list of programs allowed. If you see the lock icon in the bottom-left corner closed, you need to click on that first and enter your admin passcode to allow you to make these changes.
If pinfinder still isn’t working for you, please reach out to pinfinder directly via the Questions section and look for the sub-heading It Didn’t Work For Me.
Sam
The Pinfinder app worked great for me. Big thanks to the creator!
Tried pinfinder, but it said there was no Restrictions password, even though my iPad said Restrictions were on. Presumably I set it up when the iPad was new, many years ago, (on iOS 4) but I can’t remember doing it. Luckily I have managed to guess a number that was the correct one, on attempt 5, so I have been able to get rid of another new feature provided by Apple that has no relevance to me.
pinfinder worked for me, just in 5 seconds
Yes! Awesome David! Thanks for letting us know.