Attempting to manage your cloud storage is a frustrating task, but it’s nothing compared to dealing with your physical hard drive space. Some need to buy the entry-level spec build of a Mac to save on costs, while upgrading other things like the RAM. But after you go through and install all of your apps and actually start using your Mac, you might find yourself pulling your hair out.
The obvious benefit of using a cloud storage option in tandem with your computer is that you can offload some of those files. But that will only get you so far, as there may be files on your computer that you completely forget about. Or, you might have files in a folder that shouldn’t be there, and you don’t know how they ended up in that place.
Apple understands that people can max out the storage on their Mac pretty quickly. That’s why we’ve been seeing continued iterations of what’s known as ‘Optimize Storage’ on Mac. This is a built-in series of tasks that can be completed in an effort to free up space on your hard drive. Here’s how you can use Optimize Storage on Mac:
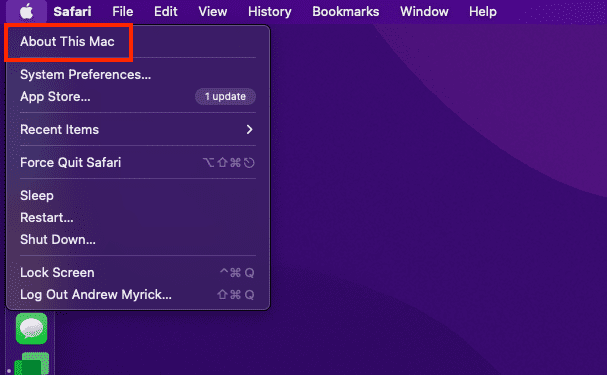
Click the Apple logo in the top left of the menu bar.
Select About This Mac from the drop-down menu.
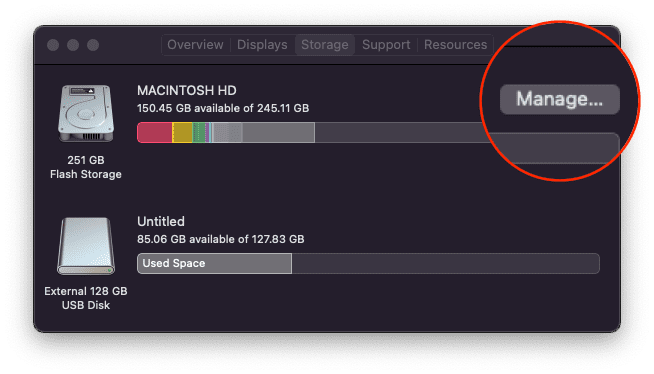
At the top of the window, click Storage.
Next to your Mac’s internal hard drive, click the Manage… button.
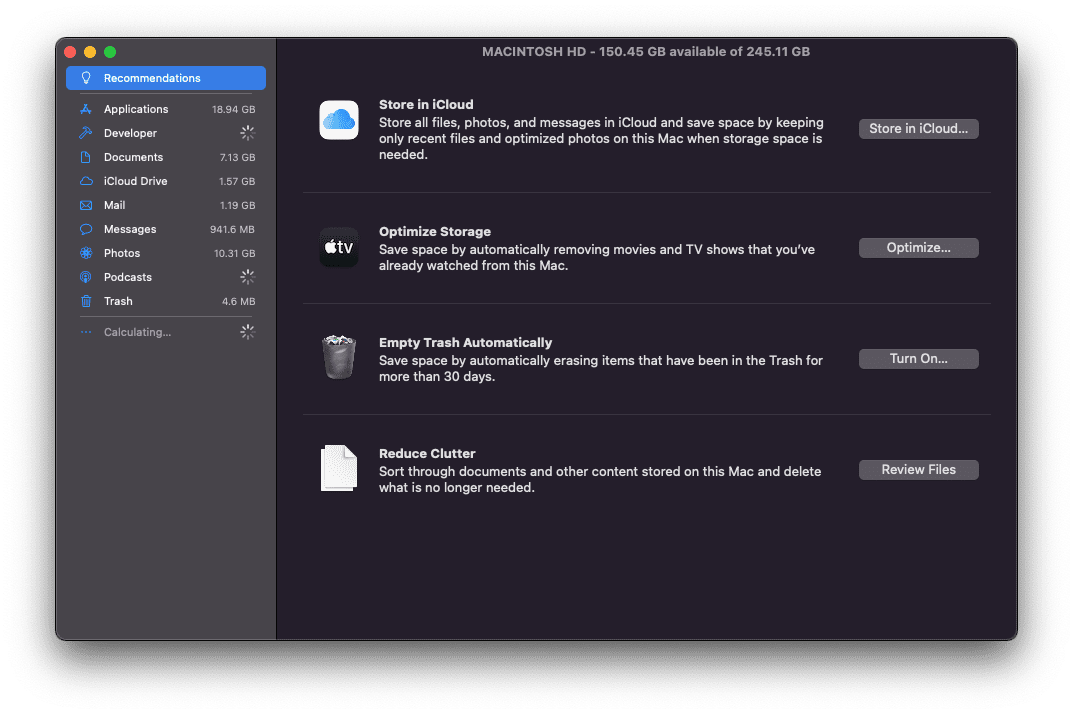
From there, you’ll be presented with another System Preferences panel, but this time, you’ll have several different options to choose from. There’s also a sidebar comprised of different categories of file and application locations for you to go through and manually manage.
Store in iCloud: Store all files, photos, and messages in iCloud and save space by keeping only recent files and optimized photos on this Mac when storage space is needed.
Optimize Storage: Save space by automatically removing movies and TV shows that you’ve already watched from this Mac.
Empty Trash Automatically: Save space by automatically erasing items that have been in the Trash for more than 30 days.
Reduce Clutter: Sort through documents and other content store on this Mac and delete what is no longer needed.
This is a great way to get an idea of where the bulk of your files and documents reside on your Mac. However, there are two options that you can see in the sidebar, but are unaccessible: macOS and System Data. Otherwise, you’ll be able to go through and look around each section as you see fit.
How to use ‘Store in iCloud’
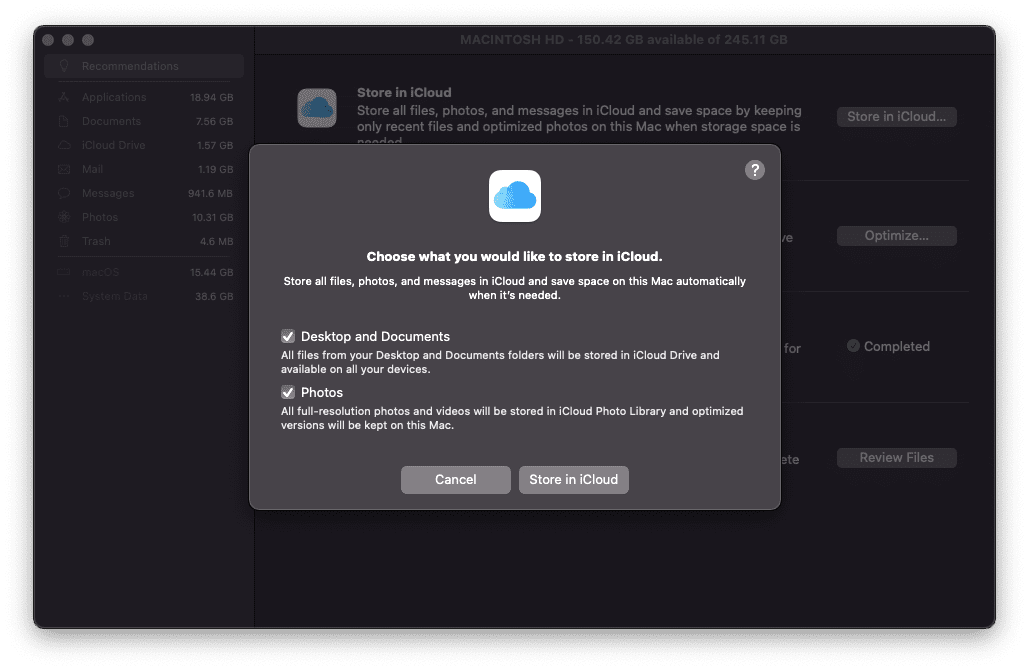
If you’re already an iCloud subscriber, and have more than the base 5GB of cloud storage, ‘Store in iCloud’ is definitely something you’ll want to check out. As the name suggests, it stores necessary folders, photos, and folders in iCloud Drive or iCloud Photo Library.
Desktop and Documents: All files from your Desktop and Documents folders will be store in iCloud Drive and available on all your devices.
Photos: All full-resolution photos and videos will be stored in iCloud Photo Library and optimized versions will be kept on this Mac.
In addition to freeing up some storage space on your hard drive, you’ll also be able to access files across easily across all of your Apple devices. And if you find yourself using this feature across multiple Macs, you might even end up seeing the same files from the Desktop of your primary computer show up on your MacBook. It’s a feature that comes in handy more times than not, and is one of the first things that I enable on every Mac that I own.
To activate this feature and start using it, navigate to the Optimize Storage menu, click the Store in iCloud button, select what you want to be stored in iCloud, and click the button on the appropriate screen.
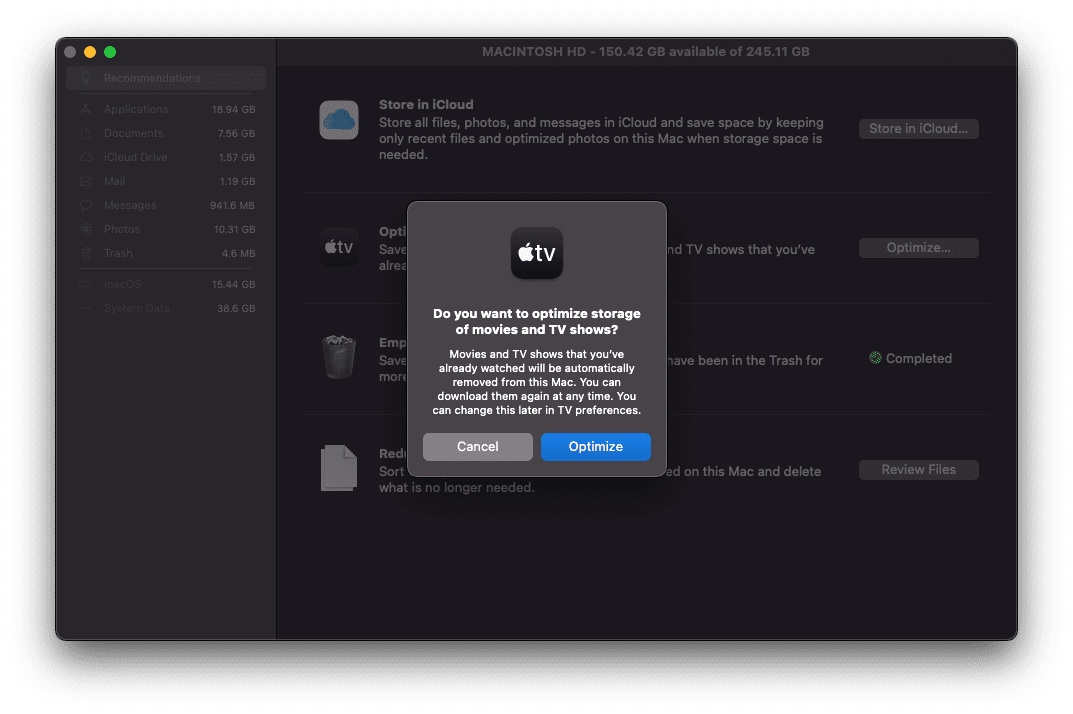
How to use ‘Optimize Storage’
Admittedly, I did not think this portion of the System Information panel would be what it is. But if you want to use Optimize Storage on Mac, it is actually designed for movies and TV shows.
Those who use the Apple TV app on their Mac to enjoy their favorite movies and shows may forget to remove the content after it’s over. With Optimize Storage, those movies and shows will be automatically removed as soon as they are completed. Considering the sheer size of movies and shows nowadays, this can end up being a pretty big culprit for eating up a bunch of your hard drive space.
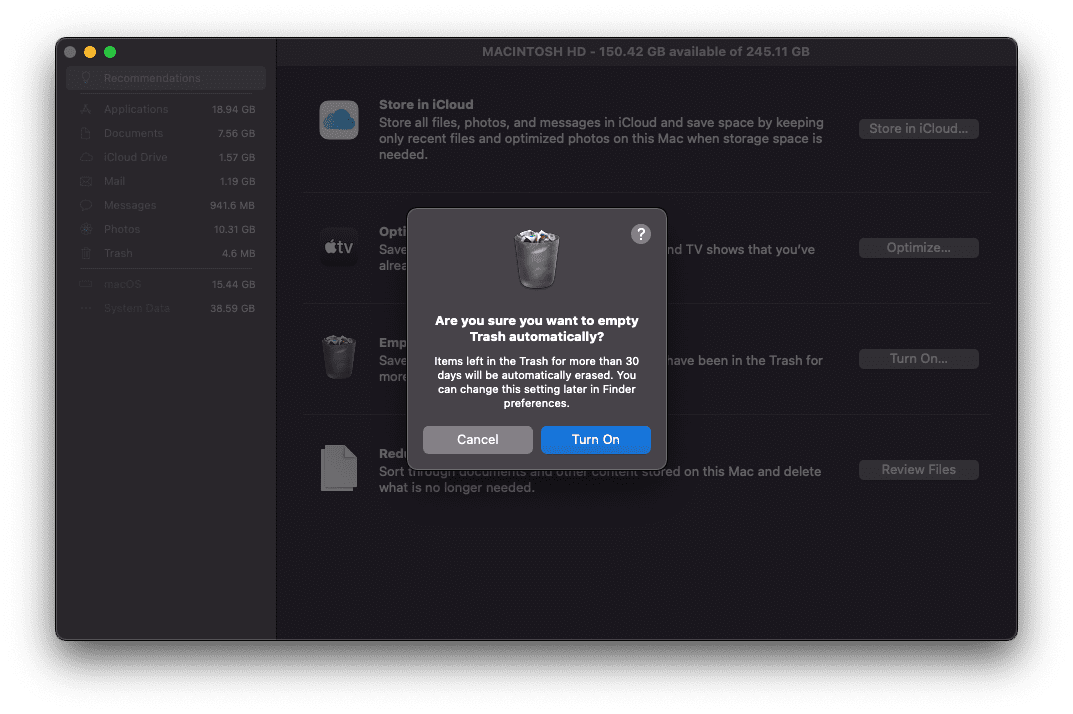
How to use Empty Trash Automatically
If you work with a lot of files, chances are you end up deleting a lot of files. But one thing that users have a tendency of doing is not emptying the Trash on their Mac. There are some that go through and delete the Trash bin multiple times a day, which is made easier by using keyboard commands with an app like Alfred.
However, Apple also makes it possible for your Mac to automatically empty the Trash without you needing to think about it. The only catch is that this only applies to files, documents, apps, and content that have been in the Trash for more than 30 days.
Click the Apple logo in the top left of the menu bar.
Select About This Mac from the drop-down menu.
At the top of the window, click Storage.
Next to your Mac’s internal hard drive, click the Manage… button.
Click the Turn On… button next to Empty Trash Automatically
To confirm, click the Turn On button again.
After you click the confirmation button, the System Information panel will show a green checkmark with “Completed” next to it. This just lets you know that you won’t have to worry about emptying the Trash full of files from months ago (or longer).
How to use ‘Reduce Clutter’
Reducing clutter sounds like something you would categorize as Spring Cleaning. And that’s pretty much the gist here when it comes to the Mac. The only difference is that instead of dusting the window sills, you’re diving into the nooks and cranny’s of your Mac’s storage system.
When clicking Reducing Clutter in the System Information panel, you’re presented with the following tabs:
Large Files
Downloads
Unsupported Apps
Containers
Browsers
When selecting and highlighting each section, you’ll also see a breakdown of how much storage that file type is using. And with how well Apple designed this layout, it’s pretty easy to go through everything to manually delete files that no longer belong on your Mac. Just select one of the tabs, highlight the files you want to get rid of, and click the Delete button in the bottom right corner.
Conclusion
No matter what you do, there are a few reminders to keep in mind when you need to use Optimize Storage on Mac. The first of which is that you shouldn’t simply delete any files that you don’t recognize. When using the Reduce Clutter option, and highlighting a file, you’ll see the filesystem path. This will give you a better idea as to whether it’s something you should delete or if it’s a file worth keeping for later.
The final recommendation we have is to restart your Mac after you’re done deleting files or tinkering in general. This helps your Mac remember what it is that you are trying to accomplish, while also kind-of acting as a “fresh start”. It’s not a necessity, per se, but it’s definitely something that won’t hurt.
Andrew Myrick is a freelance writer based on the East Coast of the US. He enjoys everything to do with technology, including tablets, smartphones, and everything in between. Perhaps his favorite past-time is having a never-ending supply of different keyboards and gaming handhelds that end up collecting more dust than the consoles that are being emulated.


Write a Comment